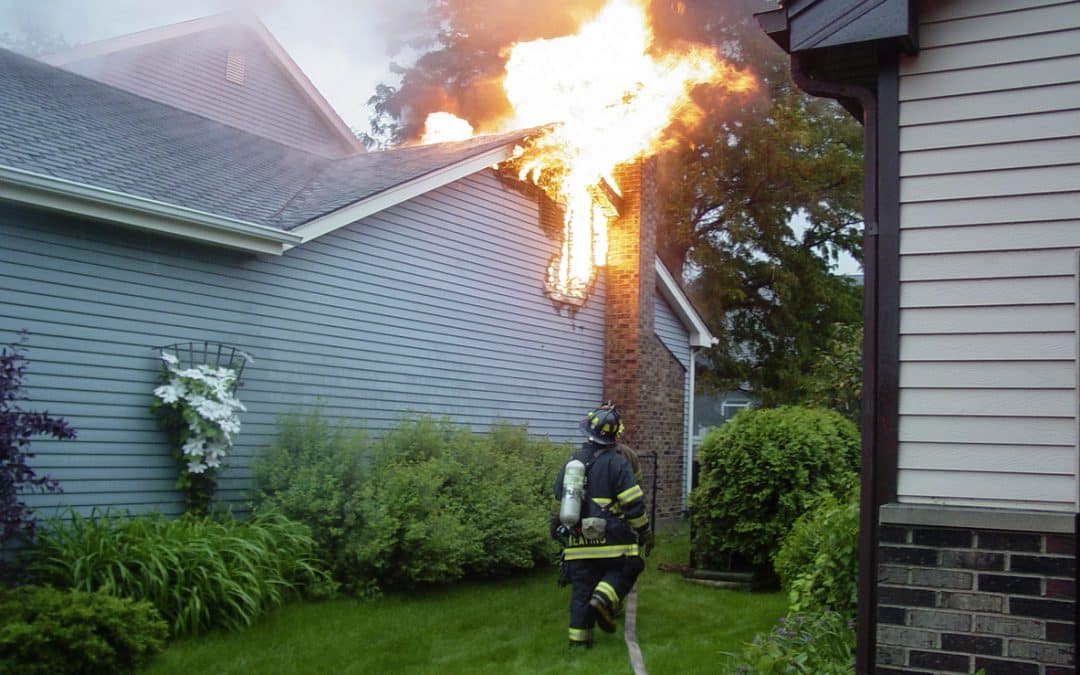
An accidental fire can start with frightening randomness, spread out of control in seconds, and ultimately destroy a house. Even tiny fires that are quickly extinguished may cause thousands of dollars in damage and put the lives of everyone in the house at risk.
Unlike other types of property damage, most household fires start because of human error. Therefore, understanding the most typical causes of home fires can preserve lives and property. When you know what to look out for, you can make better-informed decisions within your house and, hopefully, avoid these common causes of household fires.
1. Cooking
House fires often ignite from cooking accidents. You may leave your kitchen unattended momentarily and return to flames and smoke. Grease fires are common, especially since grease becomes flammable and can catch fire without a flame. Once the grease is on fire, it’s tough to put out. Also, plastic utensils and oven mitts can quickly start kitchen fires if left too close to a burner and overheat.
Always use caution when working with your oven or stovetop. To minimize the risk of a housefire in your kitchen, follow these tips:
Don’t use the oven or stove if you’ve been drinking or are feeling drowsy.
Avoid going elsewhere while preparing a meal on the stove, grill, or broiler. Turn off the stove or oven if you need to leave the kitchen, even if it’s only for a few minutes.
Keep anything flammable, such as oven mitts, wooden or plastic utensils, food packaging, towels, or drapes, away from the cooktop.
Keep pan lids, fire extinguishers, and other helpful tools nearby anytime you’re cooking in the kitchen.
Although some kitchen fires are unavoidable, it’s better to know the risks and plan than throw caution to the wind and end up with a fire you can’t put out.
2. Heating Appliances
Having a reliable heater is a must when the weather turns cold. However, certain heating appliances can increase the risk of a household fire. In particular, kerosene and other fuel-based heaters pose a significant risk. If not adequately managed, wood-burning stoves and fireplaces can also lead to a home fire.
Even if you keep the heating appliances in your home well-maintained and follow the directions, there’s still a fire risk. Fabrics and other combustibles left near heaters are a fire hazard. When drapes or other materials come into touch with the coils of an electrical heater, they may overheat and start a fire.
No matter what you use to heat your home, these guidelines can help lower your home’s fire risk:
Always check your heater before using it, and make sure it’s in excellent working order by referring to the manual. It is dangerous to keep a heater on while you are away. Almost all space heaters come with cautionary notes against using them unsupervised.
To avoid a potentially disastrous situation, keep your space heater at least three feet away from flammable materials like curtains, clothes, blankets, and furniture.
If your home relies on a furnace during the winter, call a professional to inspect it once a year to ensure it is running correctly. Always have a professional clean and examine your chimney and heating system once a year.
Think about upgrading from manual space heaters to those that turn off automatically in the event of overheating or being knocked over.
3. Electrical and Wiring Issues
You probably don’t think about the wiring in your house as a primary cause of home fires. Yet, faulty or dated wiring is another common issue for homeowners.
Most electrical fires result from an overcharge of current in the circuit or a short circuit that causes sparks. These sparks then burn nearby building materials and eventually result in flame formations. Unfortunately, these fires often start without anyone noticing because they are often hidden behind drywall and other surfaces. Also, these fires commonly occur while residents are asleep, which makes them all the more dangerous.
If you live in an older house, it’s imperative to have an electrician inspect the wiring. Also, look for any signs of electrical issues, such as breakers frequently flipping, smells of smoke, or problems when you plug items into certain outlets.
4. Holiday Decorations
Although families enjoy decorating their homes for holidays like New Year’s, Independence Day, Halloween, Christmas, and Hanukkah, some potential dangers are associated with doing so. Lights, evergreen trees, and candles can all start fires when not carefully monitored.
LED (light-emitting diode) bulbs are much cooler to the touch and should be used instead of traditional incandescent bulbs for decorating the inside or outside of your home. If you set up a real evergreen tree in your home, properly water it and take it down as soon as the holidays are over. If you light candles for holiday celebrations, extinguish them before bed and keep any flammable materials away from the candles while they are lit.
5. Candles
Candle fires cause hundreds of preventable injuries, fatalities, and thousands of dollars in property damage yearly. The soft glow of candlelight complements family meals, and many people burn scented candles to enhance their living space. However, you should proceed cautiously anytime you light a candle in your home.
Place candles in a safe, heat-resistant container apart from flammable materials. Never leave candles unattended; put them out before leaving the room or going to sleep. Also, keep burning candles a minimum of one foot away in all directions from flammable and combustible items.
If you have children, always supervise burning candles and keep matches and lighters out of reach. If matches or lighters are left where children can get them, they pose as much risk as the candles. Make sure candles are also far away from pets who could knock them over.
Following these simple safety precautions can help reduce the likelihood of a candle fire. You can also substitute candles with other forms of lighting and scent-enhancing products.
6. Smoking
Smoking is a leading cause of yearly property loss and human casualties in the United States. Carelessness with cigarettes is a significant contributor to home fires. It’s not uncommon for people to nod off while smoking or discarding cigarette butts on upholstery, furniture, and other combustibles. Throwing away hot ashes into a garbage bin, where they might catch fire, is another preventable risk.
The best option is to smoke outside and discard of your butts properly. If you must light up inside your home, do it in a well-ventilated area, or at least use a sink or an ashtray to lessen the likelihood of starting a fire inside the house.
7. Chemicals or Gasses
Chemical reactions are a leading cause of fires in homes and commercial and industrial environments. Most house fires involving chemicals start when the volatile vapors released by fuels like gasoline and other petroleum liquids reach their flash point or come into contact with a flame. Spontaneous combustion is another prevalent type of chemical fire, occurring when chemicals combine with oxygen in the air to generate enough heat to ignite.
Keep all fuels and chemicals in their original containers and store them in cool, dry areas. The gasoline or other fuel used in lawn equipment is a typical cause of these blazes.
These are some tips to secure gasoline safely:
Put your trash in a proper bin. A red plastic container with appropriate container marking is the best option for storing gasoline.
Put at most 95% of the contents into the container. This provides breathing room for the vapors within the container, preventing them from bursting it.
Gas vapors should be in sealed containers to prevent them from reaching a heat or ignition source.
Keep the container at least 50 feet away from any heat source, including a water heater, space heater, or furnace, as well as any pilot lights. The best place to keep these fuels is in a separate garage or shed. If none is available, gasoline canisters should be held on the outside wall of an attached garage.
Chemical fires may also be caused by rags soaked in oil that catch fire for no apparent reason. Never put rags that have been drenched with oil or chemicals in storage. It would be best never to store them in a pile since the fumes will react with the air and produce heat. The oil on rags may evaporate by laying it out in the sun. These may be cleaned and reused when they have dried completely.
Paint thinners, mineral spirits, and other flammable liquids should be kept in a fireproof cabinet at a place that is at least 10 feet away from any occupied areas. Maintain a secure seal on all containers.
8. Grills and Fire Pits
Many homes have grills and fire pits for use during the summertime when friends and family gather outside to enjoy the weather. Fire pits and grills may be a great way to bring people together for a good time, but they also present a severe risk of fire if not utilized and maintained safely.
The proximity of grills and fire pits to combustible materials is a leading cause of fires. Keep your grill or fire pit in a well-ventilated location, far from flammable objects like patio cushions, umbrellas, or nearby trees. Propane tanks and other possible fuel sources should be kept far from the barbecue or fire pit. These materials may easily catch fire if a single ember from a nearby grill or fire pit lands on them.
Lack of supervision is another element that can raise the risk of fire. Never leave a grill or fire pit unattended, mainly if children or pets are in the area. A slip in attention, however brief, may have dire consequences. Pets should be kept on leashes, and children should be supervised around grills and fire pits to prevent burns and accidents.
Another common cause of fires involving grills and fire pits in the home is careless fuelling. Grills and fire pits should only be used with certified fuels; never use gasoline or lighter fluid. Explosive burns and out-of-control flames are possible results of contact with these substances. For safety’s sake, always follow grill or fire pit fuelling guidelines provided by the manufacturer.
Furthermore, flames may start in grills and fire pits if not adequately maintained. Fires may begin if grease and other particles accumulate on the grates. Cleaning your grill or fire pit regularly can prevent grease and dirt accumulation. Inspect the grill or fire pit for any damage or wear and tear that might present a safety issue. Maintaining your grill or fire pit can help avoid fires and extend its useful life.
When Fires Happen, We’re Here to Help Clean Up
No one wants to deal with a household fire, but they do occur. Whether it’s a small kitchen fire or a much larger disaster, you may feel overwhelmed and unsure of how to proceed. Also, you have much larger issues to worry about, like your family’s health and well-being.
The good news is, Valley Restoration and Construction is here to help. We want you to take care of yourselves during this difficult time and leave the fire cleanup and restoration to us — it’s what we’re trained to do.
Our professionals are IICRC-certified in fire and smoke restoration and will be there for you whether you need a basic fire clean-up, soot removal, or total reconstruction and repair. We are proud to serve our community in this way, and want you to feel like you’re in safe hands throughout this process. Call us anytime, and we will help you pick up the pieces after a home fire or other natural disaster.
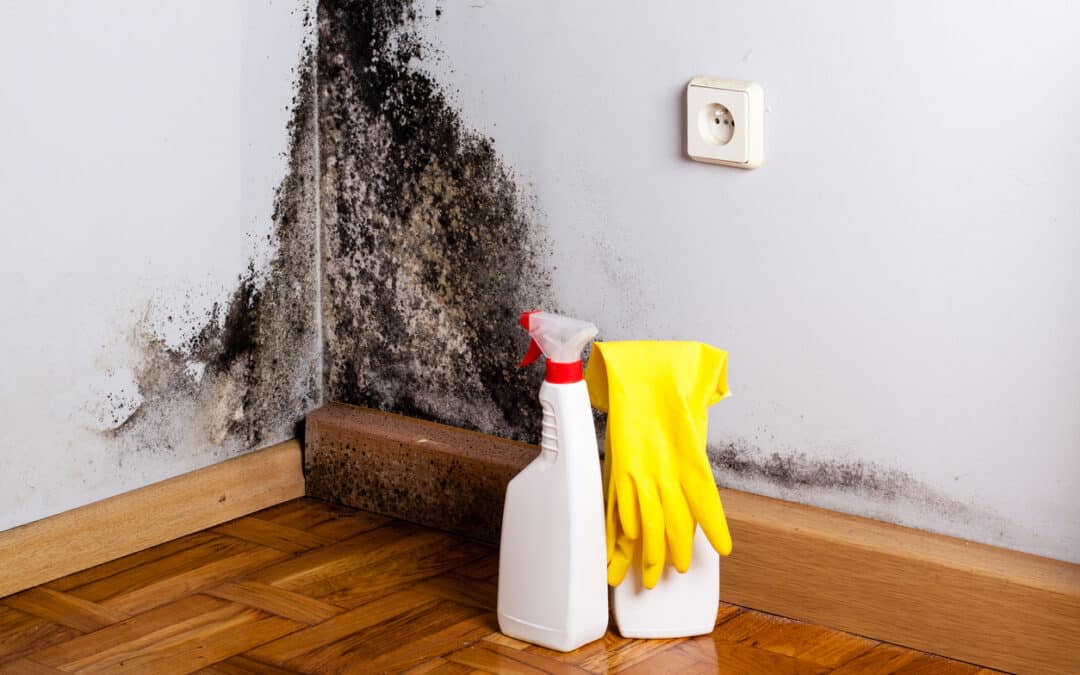
No one wants to think about mold. It’s gross and harmful to your health. Unfortunately, you have no choice but to think about it when it invades your home or workspace—you need to remove it as quickly as possible.
By understanding the basics of mold and learning about the most common types of mold that may appear in your home, you can easily identify mold habitats before the growth even starts. This will help you avoid mold growth and take the appropriate steps to mitigate mold growth in your home or workplace.
Understanding Mold
Mold is a non-green plant that grows in damp and humid environments. It reproduces and spreads steadily through the air and land in favorable growth environments. As mold grows, it releases tiny spores that cause health problems for most individuals.
Mold can be separated into three main types: allergenic, pathogenic, and toxigenic. Allergic mold is the most common type. This mold typically causes symptoms like nasal congestion, sneezing, coughing, and itchy/watery eyes. In some cases, it can induce asthma symptoms such as wheezing, shortness of breath, and chest tightness.
Pathogenic mold has adverse health conditions as it causes infections. It’s most dangerous to those with weak immune systems but can also severely impact children and older adults. On the other hand, toxigenic mold generates toxic components such as mycotoxins that are dangerous to a person’s health. Toxigenic mold also causes dizziness, nausea, and neurological damage.
Unfortunately, mold thrives in high-moisture locations throughout the home, including basements, kitchens, and bathrooms. Furthermore, it grows and spreads in organic materials often collected inside homes, such as fabric, wood, and paper. Because of this, all homeowners need to understand the most common types of mold they may encounter in their homes so they can be on the lookout.
16 Common Types of Mold That May Grow in Your Home
1. Chaetomium
Chaetomium mold is a type of fungus that can appear as a velvety growth in different color ranges such as white, grey, or greenish-black. The mold produces a musty odor accompanied by dark-colored, spherical structures called perithecia. Chaetomium forms in areas with moisture and organic material that it can feed on. The mold often grows in highly humid areas such as bathrooms, kitchens, and basements.
Chaetomium falls in the allergenic mold category. This household mold is not considered dangerous but can lead to respiratory problems. Allergic reactions, respiratory issues, and skin irritation are some of the symptoms of Chaetomium exposure.
You can prevent Chaetomium growth by preventing moisture in your home. If you see this mold, do not touch or interact with it; this can help it spread even further.
2. Stachybotrys
Stachybotrys is also known as black mold. Stachybotrys is a type of fungus that appears as a greenish-black slimy growth. It produces a musty odor. The mold is found in areas with high humidity, such as bathrooms and basements.
Stachybotrys mold falls under the toxigenic mold category. It produces mycotoxins which can cause serious health problems upon exposure. Exposure to Stachybotrys causes various health-related issues such as headaches, dizziness, respiratory issues, and neurological damage in some extreme cases.
Stachybotrys mold forms on surfaces that have been damp for a prolonged period, like areas affected by leaks and flooding. Stachybotrys mold is often associated with severe water damage caused by bursting water pipes, hurricanes, and flooding. If you have experienced any type of water damage, it’s best to call in professionals like Valley Restoration and Construction so we can assess your home for this toxic mold.
3. Trichoderma
Trichoderma mold is a fungus. It appears in color ranges such as green, white, or yellowing growth and has a woolly texture. The mold grows on different surfaces, including soil, plants, and building materials.
Trichoderma mold frequently grows in damp areas and places with high humidity, such as the kitchen or crawl spaces underneath the home. Trichoderma mold can also appear in buildings that have experienced prolonged water leaks and homes with poor ventilation.
Trichoderma is classified as an allergenic mold but exhibits pathogenic properties. Exposure to Trichoderma mold causes allergic reactions, sneezing, runny nose, and skin rashes. Trichoderma can also cause respiratory problems in people with weakened immunity.
To prevent Trichoderma mold effects, consider addressing moisture problems in your home. You may also want to evaluate your home ventilation system and seek options to mitigate moisture accumulation.
4. Alternaria
Alternaria mold appears as a black-greenish-brown fuzzy growth. Alternaria mold grows on soil, plants, and building materials such as drywall and insulation. Often, Alternaria mold thrives in areas with high humidity levels. This means it can grow on surfaces that experience extended exposure to moisture due to water leakage and flooding. However, older homes with poor ventilation and high moisture levels can also see Alternaria growth.
Alternaria is an allergenic mold, and it contains some pathogenic traits. When exposed to Alternaria mold, an individual may experience allergic reactions such as skin rashes, runny nose, and sneezing. Exposure to Alternaria mold can also lead to respiratory problems for some individuals, especially those with underlying health conditions.
To address Alternaria mold infestation, consider ventilating homes properly and installing proper drainage to prevent stagnant water and cases of moisture in an indoor environment.
5. Ulocladium
Ulocladium mold is from the fungus kingdom and has a dark brown to olivaceous black growth, and it resembles the Alternatria mold. It is often found in decaying plants, wood, soil, and dust and thrives in moist and damp areas. It feeds on vegetables, especially nuts, beans, and cereals. Ulocladium mold can grow in low-humid regions and is mainly found outdoors. However, this doesn’t mean you can’t find it in your home.
Ulocladium mold falls under both allergenic and pathogenic categories. It causes an allergic reaction in humans, including eye irritation, sneezing, and skin rashes. Because it is a pathogenic mold, it can also lead to respiratory complications, such as asthma and bronchitis.
Indoor environments should be made waterproof to prevent moisture from accumulating in the house to avert Ulocladium mold spread. Contacting professional mold remediation is essential to carefully and safely remove molds from living settings.
6. Serpula
Serpula appears as white, gray, or yellowish growth. It has a cottony texture. It commonly crops up in damp areas and thrives in spaces with high humidity, such as bathtubs and kitchens.
Serpula is categorized either as allergenic or pathogenic. Exposure to Serpula mold automatically causes an allergic reaction, such as skin rashes and sneezing to an individual. Furthermore, a person will suffer from respiratory-related problems such as asthma and bronchitis on exposure to serpula mold.
Serpula is a dangerous mold. You must handle it carefully. However, you can prevent this mold from growing by regularly ventilating high-moisture areas and checking for water damage regularly.
7. Mucor
Mucor mold appears in either white or grayish growth with a fluffy texture. These molds grow on various surfaces, such as building walls, decaying plant matter, soil, and food.
People should avoid exposure to mucor molds because of the dangers that can come from prolonged exposure. Living alongside Mucor can lead to respiratory problems such as bronchitis and asthma. The mycotoxins it produces can also cause liver damage, pulmonary hemorrhage, and even death.
8. Aspergillus
Aspergillus mold appears as green, yellow, or blackish growth with a powdery texture. It grows on various surfaces and building materials, such as drywall and carpet. Although it can grow in bathrooms and kitchens, Aspergillus often appears in home ventilation systems, making it especially dangerous.
This mold is pathogenic and allergenic. Exposure to Aspergillus can cause an allergic reaction, asthma, and sinusitis. However, its mycotoxins are carcinogenic, causing lung infections. To remedy Aspergillus mold, ensure the indoor living environment is moisture-free and repair damaged leaking water pipes.
9. Penicillium
This type of mold looks like a blueish or greenish growth and has a fluffy texture. The mold forms on various surfaces, including food, carpet, soil, and wallpaper. Humid and damp environments contribute to its formation and feed its growth. The mold can also spread through ventilation systems due to its presence in indoor air.
Upon contact with Penicillium mold, some people experience allergic reactions, including itchy eyes, coughing, and sneezing. It can also cause hypersensitivity pneumonitis, asthma, liver damage and cancer, especially if you let it continue to grow in your home.
10. Aureobasidium
The mold entails a suede-like texture and appears as a black growth. You often see it on windowsills, showers, and damp walls. It also feeds on paint, wallpaper, and other building materials.
Aureobasidium is an allergenic mold. It results in various allergic reactions in individuals, including itchy eyes, coughing, and sneezing. In addition, it also contributes to respiratory problems such as asthma and hypersensitivity.
The easiest way to avoid Aureobasidium growth is by ensuring that your home is properly sealed so water can’t enter around windows or through the walls. You can also use dehumidifiers in older homes to alleviate dampness in the air.
11. Acremonium
Acremonium is a toxigenic mold that appears grey, white, or pinkish and is usually fluffy or powdery. It forms in basements, kitchens, and bathrooms.
This mold usually generates mycotoxins that cause respiratory problems and skin irritation. Due to its adverse characteristics on individuals’ health, exposure to it for a long time can result in other critical health conditions, including organ damage.
If you have a basement, you should regularly measure the moisture levels and check for potential places where moisture can enter your home. Fixing these issues and adequately caring for other areas in your home that produce water will help prevent Aureobasidium growth.
12. Cladosporium
This allergenic mold looks black or green with a velvety texture. It can grow outdoors or indoors and often appears on moist surfaces where water sits for long periods of time.
Prolonged Cladosporium exposure significantly affects an individual’s health. It causes everything from allergy symptoms to respiratory problems such as hypersensitivity pneumonitis.
13. Fusarium
Fusarium is pinkish, whitish, or reddish with cotton texture. Additionally, this toxigenic mold produces yellow or green spores. Fusarium forms in wet environments such as plant debris, damp building materials, and soil. It also contaminates fruits, grains, and vegetables.
Many health effects are associated with toxins, including gastrointestinal, respiratory, and skin issues. Prolonged exposures to Fusarium can also cause neurological problems and cancer, due to the harmful mycotoxins it produces.
You can prevent mold growth by solving the moisture issues in the indoor environment.
14. Aspergillus species
This mold appears in many colors, including white, green, gray, yellow and black, and also has a velvety texture. Some species of this mold are powdery and woolly.
The mold’s species are found in decaying vegetation and other organic materials such as compost and food. They also grow in wet environments such as bathrooms and damp basements.
Aspergillus fumigatus, a species of Aspergillus, has adverse effects on health as it causes respiratory infections. It also causes allergies and invasive diseases. The mold also generates mycotoxins that contaminate food products. When ingested, this mold can pose serious health risks.
To prevent its growth, one should control the moisture levels, maintain proper ventilation and repair any leaks.
15. Cryptococcus neoformans
It falls under the category of fungus although being classified in the group of molds as it bears similar characteristics as the latter. It has a spherical structure and is small in size. It also has a smooth surface and appears gray or brown. It usually forms on bird droppings and indoor surfaces such as ventilation systems, windows, and doors. It is pathogenic and results in infections. Those with underlying health conditions or a weakened immune systems should avoid all exposure to Cryptococcus neoformans.
16. Histoplasma capsulatum
Histoplasma capsulatum is also a type of fungus but is categorized with molds. The fungus has a yeast-like structure. It is small and round. The fungus gets into the body through inhalation in areas it has developed. Histoplasma capsulatum can lead to severe health conditions such as histoplasmosis that majorly affects individuals with weak immune systems. It also affects many body organ systems and is described as systemic mycosis.
Don’t Mess With Mold: Let The Experts Clean It Up
Unfortunately, every mold on this list can quickly spread within your home once it begins growing. This is why it’s important to take appropriate precautions and seek professional help as soon as you see any signs of mold in your home.
At Valley Restoration, we take mold very seriously. Our team is Applied Microbial Remediation certified, which means we will do all that we can to make sure the contaminated area is treated properly so you can get back to enjoying your home. We will never walk away from a job until we’ve accomplished the right amount of mold remediation to meet our high standards.
If you need help removing mold from your home or want an inspection, give us a call at 970-964-4437.
Almost 50% of Colorado homes have increased radon levels exceeding the safety threshold defined by the EPA.
Colorado is the 9th most affected state regarding radon, mainly because of its soil composition. Uranium-rich soil produces radon that slowly seeps through cracks and enters homes and buildings.
Radon is the second leading cause of lung cancer after smoking. As radon mitigation experts, we thus strongly advise all homeowners to test their homes for radon exposure.
Newly built constructions should follow simple guidelines to limit radon exposure. Older structures are at risk and should be checked for radon. If radon levels are high, call Valley Restoration and Construction, and our experts will be with you to mitigate the problem.
What Is Radon?
Radon is a gas that is produced from uranium-dense soils. When uranium breaks down, radon is produced and evaporates into the air. Radon slowly enters buildings through cracks in the foundation and the basement, posing a significant health risk.
Radon is odorless and colorless but radioactive. Radiation from radon can damage our cells and slowly degrade our health. When cells malfunction, the result is often cancer.
Radon in Nature
Wherever there is uranium lingering in the soil, radon is released. Out in the open, radon dissipates and doesn’t cause any health damage.
However, in closed environments such as homes, buildings, and offices, radon levels build up and can’t escape. Even worse, indoor spaces suck up radon from the soil because of the air pressure difference between the soil and the indoor space. Radon is trapped inside the house, where levels slowly amplify if there is no escape route.
Radon Safe Levels
The air quality in your home is crucial to your health. The EPA has defined the safety levels for radon exposure to 4 pCi/L. Levels above this threshold are dangerous to human health and should be reduced.
Even if your home tests below this threshold but is close to it, you should contact a radon mitigation specialist like Valley Restoration and Construction to lower radon exposure in your home. The lower the radon level, the healthier your family will be and the least the possibility of lung cancer for you and your loved ones.
Radon-Resistant Construction Basics
Prevention is better than mitigation, and it costs less for construction companies to adopt radon-resistant construction practices. A knowledgeable constructor will take preventative measures to limit the home’s exposure to radon. Prospective homeowners have the certainty that the house is safe and won’t have to mitigate radon exposure.
Construction companies have several ways to prevent radon issues, from very simple to more complex.
Gravel
The first step in radon-resistant construction is installing a gravel layer below the foundation. If there is a basement or crawlspace, builders should place the gravel layer below it. Radon will circulate in this gravel layer and dissipate instead of entering your home.
Polyethylene Layer
A polyethylene sheet is placed on top of the gravel layer to trap the radon and stop it from evaporating into the house.
Vent Pipe
Once the two previous steps are completed, a vent pipe is installed. A plumber installs a vent pipe that directs the radon found in the foundation outside and away from home.
This vent pipe typically climbs up from the gravel layer to the roof. Once at roof level, radon can escape into the air, dissipating without posing any risk to human health.
How to Prevent Radon in Existing Constructions
What if your house is an older one, though, or your construction company hasn’t adopted radon-resistant practices while building it? Is your home a healthy living environment, then?
Interestingly, some radon mitigation techniques are the same as those for energy efficiency and moisture protection. A professional radon mitigation company like Valley Restoration and Construction can help you neutralize radon exposure inside your home.
Vent Pipe with a Fan
It may be impossible to install a layer of gravel under the foundation of your existing home. You can, however, install a vent pipe with a fan to suck up the radon from the soil and direct it outside of your house.
This technique, known as a soil depressurization system, stops radon from entering your home from the basement up.
Seal Cracks and Openings
Another way to mitigate a radon problem in an existing home is to seal all cracks in the basement. Since radon is gas, it can easily seep through even the smallest gap, crack, or broken surface. Because our homes are closed spaces, even a small but consistent gas flow will quickly create a considerable buildup.
Testing for Radon
Most states have radon issues, with Alaska being the most affected state with 10.7 pCi/L. Colorado comes 9th, with 6.8 pCi/L on average. This doesn’t mean all homes in Colorado have increased radon exposure. A radon test kit will tell you if your home is contaminated.
Test a Home for Radon Before Buying It
Before you buy a new home, you should test it for radon. There are radon test kits that are affordable and easy to use. While the safety threshold is 4 pCi/L, a reading that is only slightly lower is still cause for concern as radon can quickly build up beyond that level.
Radon in Existing Homes
A radon-free home will keep you and your family safe and offer you peace of mind. If you have any doubts about the safety of your existing home, you should have it checked. If the radon levels are worrying, you should immediately call radon mitigation specialists to solve your radon problem.
Once radon-mitigation measures are complete, measure the radon levels again. This will give you a baseline of what radon levels should be in your home.
Check for Radon Regularly
The fact that you don’t have a radon problem today is reassuring. To be safe, however, you should test your home regularly with a radon test kit.
For example, cracks in the basement can occur, letting radon seep through. In addition, radon could build up in your home if some of your radon-resistant measures are compromised due to unforeseen events. Even a small tremor can crack a basement seal and let radon into the house. It is best not to be complacent about radon levels in your home and monitor them routinely.
Valley Restoration and Construction
Radon issues are real, but with Valley Restoration and Construction, you have trusted radon professionals who will mitigate the problem.
Our technicians are skilled and have extensive experience in radon mitigation. We are available 24/7 and serve Montrose, Colorado, and all the surrounding areas. If radon testing shows that your home is exposed to radon, call Valley Restoration and Construction at 970-964-4437, and we will be with you immediately to start remediating the problem.
Floods, broken pipes, or any other kind of water damage can be devastating. Thankfully, you can salvage and restore a lot of your wooden furniture with the help of mitigation and restoration professionals like Valley Restoration and Construction.
This guide will help you understand what happens to furniture after water damage and what you can do to minimize—or even mitigate—the water damage.
Clean Water, Grey Water, or Black Water?
Before you can even get your belongings out of the water, you should first consider what type of water has caused the damage:
Water from broken pipes that are connected to sinks, bathtubs, and internal water supply lines is relatively clean because it contains no pathogens or bacteria. Appropriately, this is the so-called clean water.
Grey water comes from washing machines, dishwashers, and toilets. This kind of water may contain pathogens, so you should handle it with care.
Black water comes from sewage overflow. It is brimming with bacteria and pathogens and should only be handled by specialists with proper training and the right equipment.
If your furniture has been damaged by clean water, you can move it yourself without risking your health. If, however, black water caused all the damage, you should call in restoration professionals who have the right gear to tackle such dangerous water.
First Steps after Water Damage
When facing water damage, most people despair. That’s absolutely understandable. When you see your belongings floating in the water, it can be easy to imagine they are all ruined.
So, let’s think about the unthinkable and imagine that your house has suffered water damage. What are your next steps?
Move the Furniture out of the Water
Once you have determined that the water that caused the damage is not dangerous to your health, you can start moving furniture away from the water.
A lot of things can be saved this way, especially if you act quickly. The less time wooden furniture stays in the water, the higher your chances of successfully restoring it. When wood stays in contact with water for too long, it seeps through the wood and enters the wood fibers. Wood is porous, so it will absorb as much water as it can.
MDF (Medium Density Fibreboard) and plywood furniture, in particular, are highly sensitive to water damage because they act as sponges, literally soaking up water. In many cases, this type of furniture is beyond repair and should be discarded.
Solid wood furniture, as its name suggests, is made of solid wood and is far better equipped to withstand water soaking.
Assess the Value of Your Furniture
Before you start the mitigation and restoration stages, ask yourself what value you put on your furniture and compare it to the extent of the damage.
A small flood caused by clean water causes limited damage. You can probably dry out the furniture and restore it without too much expense or effort.
A larger flood from dubious water might wreck your furniture. Furniture made from MDF and plywood will likely be beyond repair, so it’s best to throw it out. Since MDF is relatively inexpensive, the cost of saving it, drying it, and repairing it is typically greater than buying a new piece of furniture.
If you have a particularly valuable piece of furniture that has financial or sentimental value, you may want to save it. In this case, you should focus your attention on drying it in optimal conditions.
Let the Furniture Dry
Once you get everything out of the water, it is crucial that you resist the urge to start fixing things right away. When wood is soaked, it expands fast. If you try to pull out any drawers and shelves, you risk further damaging your furniture.
Instead, you should let the furniture fully dry out first. Be careful not to rush things. In particular, avoid exposing the furniture to direct sun or heat. Extreme and sudden heat will cause the already damaged wood to crack, split, or distort. Instead, leave the furniture in a well-ventilated area away from the sun to dry out on its own. You can put a dehumidifier to absorb excess water and humidity from the air.
Don’t Force Drawers and Shelves
Water has probably caused the wood to expand and swell. Shelves and drawers are likely to be stuck. Let the wood dry out entirely before you assess the full damage to your furniture by removing the drawers and shelves.
Meanwhile, Mold Is Building up
It only takes mold a couple of days to start colonizing your furniture. To prevent mold damage, you should clean thoroughly every nook and cranny and dry it out with a cloth to remove any residual moisture.
If possible, use a fan or dehumidifier to remove humidity from the air and help the wooden furniture dry in a quicker but safe way.
Once the Furniture Has Dried out
Once the furniture has dried out, you will be better able to assess the damage.
Depending on the furniture’s condition, you may need to sand any parts that have cracked or swelled. Most probably, joints and veneers will need a retouch because water can be highly damaging.
Apply furniture oil to the surface and rub it in until there is no oil residue.
If your furniture has swollen, cover its surface with a wet towel and get your iron. Set it to a low-temperature setting and hold it on the towel, moving it around after a few seconds. Not only can this help (literally) iron out any swollen surface but it may also eliminate water stains.
Hopefully, your furniture will be as good as new by the time you finish, particularly if you took it out of the water right away.
Valley Restoration and Construction in Montrose, Colorado
A restoration company can help you decide on the best course of action and save your furniture, especially if you act fast. Trust Valley Restoration and Construction to mitigate water damage in your Colorado home.
We are available 24/7 and serve Montrose, Colorado, and all the surrounding areas. Call us at 970-964-4437 or contact us online and we will be with you right away to help you restore the damage!
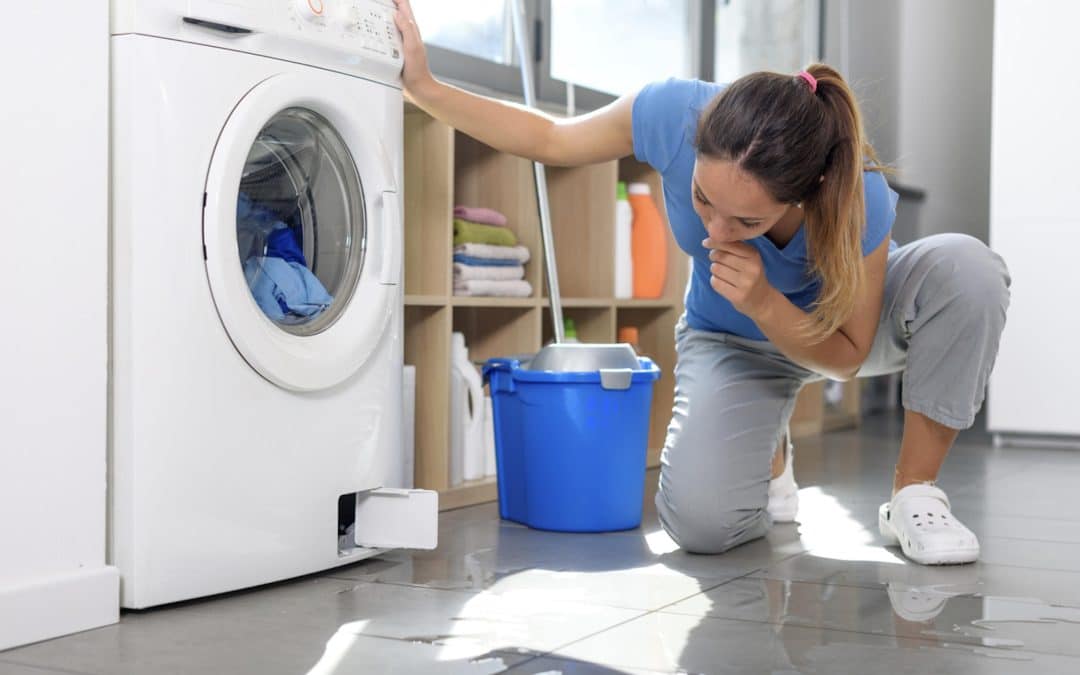
We often talk about storms, rain, snow, and other external threats to your home’s integrity. However, water damage often comes from within—specifically, from appliances that use water.
Today’s life is so good compared to the past. Refrigerators keep our food fresh and hand out ice cubes. Washing machines wash our clothes, and dryers dry them. Dishwashers clean our dishes, so they are ready for our next meal. Water heaters keep us comfortable and warm.
Unfortunately, these appliances are also among the most common culprits for water damage in a home. Any appliance that connects to the water supply utilizes water. And sometimes things go wrong.
The most fragile and dangerous parts deliver water to our appliances: water hoses, drain lines, and water supply lines. If these fail, a water leak can ruin your hardwood floor, drywall, and even furniture. Water damage can have unexpected consequences, so read on to learn how to stop this from happening to you!
1. Dishwashers
There is no greater pleasure than knowing you don’t have to do the dishes. You load your dishwasher, and they are clean and dry a few hours later. It’s almost magic worthy of Camelot.
Dishwashers, however, are prone to water damage because they require large quantities of water to perform the task. When dishwashers break down, it is usually in one of three main ways:
Water may leak from the front through the door if you don’t load the dishwasher properly or use inadequate soap. Also, water could leak onto the floor if the door seal is worn.
The other way is from the back, where the hose and water connection is located. A dishwasher pulls in large quantities of water and then discharges the dirty water. These actions commonly result in sudden bursts of water gushing into and out of the dishwasher. If the hose is loosely attached, it could detach when the dishwasher sucks in or discharges water. As a result, gallons of water may be released under your dishwasher, onto your kitchen floor, and under the cabinets.
Food buildup inside the dishwasher could clog the pipes and drains, leading to water backup.
We suggest you check your dishwasher for internal food buildup, loose water hoses, and broken front seals. A small leak can lead to a larger one, so make sure you take care of it before it becomes a real problem.
2. Washing Machines
Just like dishwashers, washing machines have made our lives much easier. They wash clothes, remove stains and odors, and even wring them for minimum moisture and faster drying.
However, you must watch out for leaks and water damage wherever water is involved. Leaks can occur around the water hose. Worse, the hose may come loose after a sudden water discharge and flood your floor and laundry room.
In addition, washing machines get rid of dirty water through drains. If these get clogged, the used water may back up and flood your home.
The best thing to do is to maintain your washing machine and run periodic inspections on the hose, clamps, water supply lines, and door seals. If your washing machine displays water leakage problems, no matter how small, you should tend to them immediately.
3. Refrigerators
Could you imagine your life without ice cubes or, even worse, ice cream? It is almost impossible to imagine how people used to live without refrigerators, and there is no home without one.
Water lines connect your refrigerator to the water supply, which is how you have ice cubes popping out at the flick of a finger. If the water line gets loose or cracks, leaks will appear in the back of your refrigerator. Even though refrigerators don’t utilize much water, they can be quite troublesome when it comes to water damage.
By their nature, refrigerators produce moisture, which collects at the appliance’s bottom part. If the drain line gets clogged, water will start seeping through, collecting underneath the fridge. Another issue can be problems with the ice maker.
Again, proper maintenance and careful inspection of the refrigerator’s back could prevent a water leak that could damage your kitchen cabinets and even lead to electrical issues.
4. Water Heaters
We take warm water for granted, and with good reason, as almost all homes are equipped with water heaters.
As the name suggests, water heaters warm and transfer water throughout the house. They contain large quantities of water, however, so if there is a leak, it will be a significant one.
Either the water supply lines can leak, or the tank itself may crack. Water heaters are prone to corrosion, particularly in areas with alkaline water. The mineral buildup eats away at the inside of the water tank, eventually leading to a crack—and water gushing out.
Water heaters can also burst if too much pressure builds up. If you hear hissing sounds, you should have a specialist check it out.
As with all appliances, annual maintenance is crucial. As a precaution, you can flush the tank once a year to remove residual minerals and sediments that have built up inside the tank. This will help prevent internal corrosion.
5. AC Unit
AC units produce condensation, which they pull out of your home. This condensation is captured in a drain pan and driven outside of the house through a condensate drain line. If the drain line gets clogged, the water trickles back into the AC unit and drips down your wall.
Another common problem is a failing drain pan, in which case the water is not directed to the drain line but comes back into the house.
If your AC starts dripping water inside, staining your walls, furniture, and hardwood floor, you must turn off the unit and call a specialist.
Valley Restoration and Construction for Water Damage Mitigation and Restoration in Montrose, Colorado
Sometimes, no matter how meticulous you are with keeping your appliances in perfect condition, water damage occurs. It usually happens at the most unexpected and irritating time, too!
Drywall is used for walls and ceilings and is a great way to build internal walls as well as design features. Its resilience and versatility make it the perfect building material, which is why it has largely displaced lath and plaster walls.
Drywall is made of gypsum and heavy paper. This makes it highly versatile and easy to install. It is lightweight yet strong and can be sound- and temperature-insulated. As a bonus, it is less expensive to install compared to other construction methods.
In addition, drywall can be cut to the exact dimensions your home requires: this inherent adaptability makes it suitable for design features such as arches and encasings. You can build shelves, countertops, wall features, room dividers, ceilings, storage spaces, displays, and even furniture from drywall.
Another advantage of drywall is that you can hang, place, or decorate whatever you want on it.
The only downside to drywall is its susceptibility to water damage, as gypsum and paper absorb water readily. A few drops of water will not crumble or damage your drywall but a major water leak or flood can cause serious damage.
If this has happened to you, you need to call Valley Restoration and Construction to inspect the damage, stop and repair the leak, and replace your drywall with new sheets. Also, mold starts building up when water lingers in building materials. Even if you replace the drywall yourself, you needmold specialists to stop the spread of mold and moisture.
How Do I Know If My Drywall Is Water-Damaged?
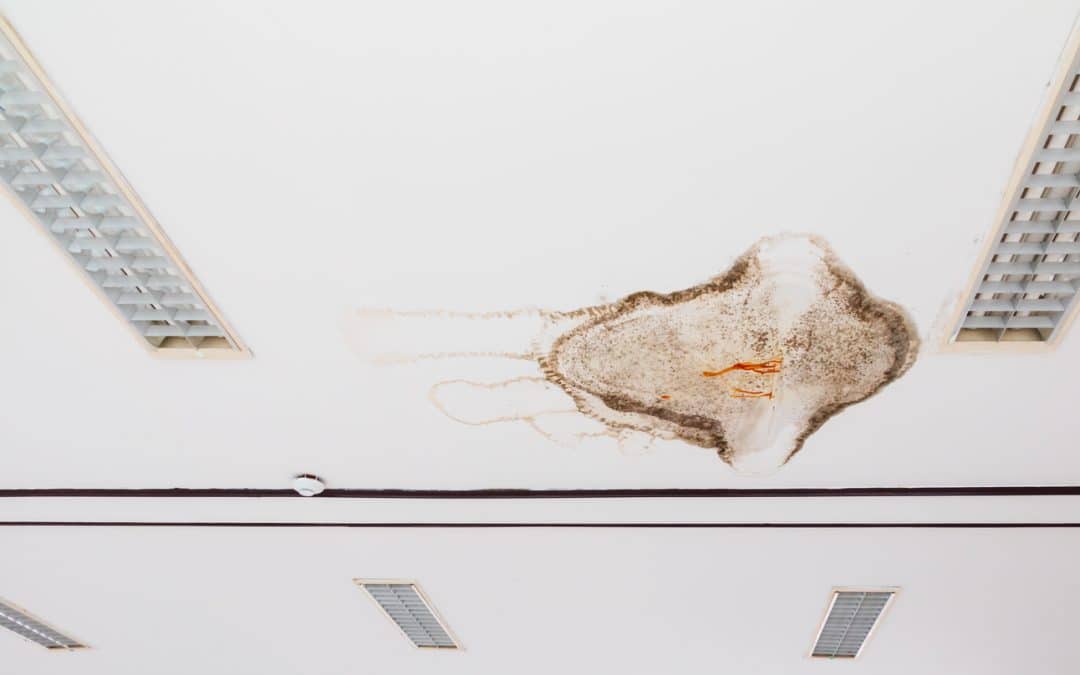
Stains On Your Drywall
The first thing to notice is coffee-colored stains or discolored paint. It can be a small area at the bottom or top of the drywall or it can be a larger stain. If the stain grows with time, the water problem is getting worse.
You should consult with Valley Restoration and Construction right away to mitigate the problem and protect your home and health.
Sagging and Crumbling Drywall
One of the most common places to find asbestos in residential dwellings is in the drywall texture and joint compound. This could be especially concerning in instances where the drywall is sagging or flaking, thus causing any potential asbestos material to become friable.
If your drywall is crumbling or displaying signs of disintegration, water has entered the integral part of the drywall and damaged the gypsum. This can be particularly dangerous with drywall ceilings, because pieces of the ceiling can collapse on you and your family.
Drywall walls can get warped with water. This happens when water decays the internal structure of the drywall and weighs it down, so that the wall starts sagging and warping. As it gets saturated with water, it starts bulging, hence the picture of a warped wall.
Flaking Paint
If drywall paint is peeling, flaking, and shedding, you may have water damage inside the drywall slowly eating away at your wall’s integrity.
If its integrity is compromised in such a way, drywall can’t recover its original shape. Unfortunately, you will need to replace it.
Mitigate the Water Leak and Fix the Problem
If you have signs that your drywall may be water-damaged, you should call Valley Restoration and Construction in Montrose, Colorado to inspect the problem and restore it. Depending on the exact causes and extent of the damage, we will fix the water leak, check for mold, and replace the drywall.
Fix the Water Leak First
Water damage may come from a leaky roof, a broken pipe, a toilet problem, a leaking washer or other plumbing issue.
Remember that water travels far: if you see water damage on your drywall, the problem may not be located directly behind it. Water could easily have traveled there from farther away.
Once the water leak has been taken care of, you need to tackle the drywall. Small damage may be fixed easily, but drywall that is sagging, crumbling, and warping is beyond repair. You need to remove the damaged drywall and replace it with new. Luckily, drywall is easy to replace and budget-friendly.
Be Cautious about Mold
It only takes 24 to 48 hours of moisture for mold to set in. Even if you have taken care of the water issue, mold colonies may already be building inside your wall.Mold can severely impact your health, so you need to act right away.
Once you remove the drywall sheets, you need to dehumidify and dry out the affected area. If there are signs of mold colonies, ourValley Restoration and Construction mold specialists will decontaminate the area, remove mold spores with the right tools and chemicals, and dry it out to remove any residual moisture.
We have dehumidifiers and professional fans to remove humidity from any affected areas. We also have HEPA filters to decontaminate the air from mold spores and special sprayers to sanitize all affected areas.
If Drywall Damage Was Caused by Sewage Backup
If the water damage on your drywall was caused bysewage backup, you shouldn’t attempt to clean or remove any drywall sheets on your own. Call Valley Restoration and Construction and we will take care of the issue.
Sewage water is filled with harmful bacteria that require special equipment, chemicals, and know-how to exterminate. Your everyday home detergents cannot properly sanitize or disinfect such bacteria-loaded black water. In addition, you may need toclean, sanitize, disinfect, sterilize, and deodorize the house depending on your exact circumstances.
Small Water Spills on Drywall
A glass of water spilled on drywall doesn’t require you to remove the whole drywall sheet. Wipe out the water with a cloth and make sure there is no residual moisture lingering on the drywall.
If you have a bigger spill and wish to be extra cautious to avoid the development of mold, place a fan toward the affected area and run it for a few hours to remove any excess humidity.
Valley Restoration and Construction for Your Drywall Emergencies
Our crew will be with you to inspect the problem, fix the water leak,mitigate the water damage, and replace your drywall. We are available 24/7 and serve Montrose, Colorado, and all the surrounding areas.