When disaster strikes, it can devastate families and business owners. Fire, water, or storms can leave behind a chaotic mess of damage and debris. Amidst the rubble, important documents often end up damaged or destroyed.
We often need to pay more attention to the significance of these documents before calamity hits. Restoring these valuable documents is crucial for rebuilding life post-crisis. Our guide will show you how to save your documents after disaster strikes so you don’t lose them forever.
What is an Important Document?
Not all papers around your house are essential documents or necessitate restoration. Important documents are crucial to dealing with a crisis’s aftermath and daily life. They hold unique information for personal identification, legal validation, banking transactions, or record-keeping. These documents are hard or impossible to replace, so restoring them is crucial.
Examples of Important Documents
This vague definition might leave you wondering what exactly qualifies as important documents. The following list highlights various examples of essential documents to prioritize for restoration.
Personal Identification: Birth Certificates, Passports, Driver’s Licenses
Educational Records: School Transcripts and Diplomas
Medical History: Prescription records and Immunization cards
Financial Statements: Tax returns and Banking slips
Legal Paperwork: Contracts, Property Lease Agreements, Marriage Certificates and Insurance policies
Personal Records: Family photos, Letters and Journals
What Types of Documents Can Be Restored?
When disaster strikes, it’s easy to feel overwhelmed and assume that your precious documents are lost forever. However, depending on their condition and the extent of the damage, you can repair many types of damaged documents.
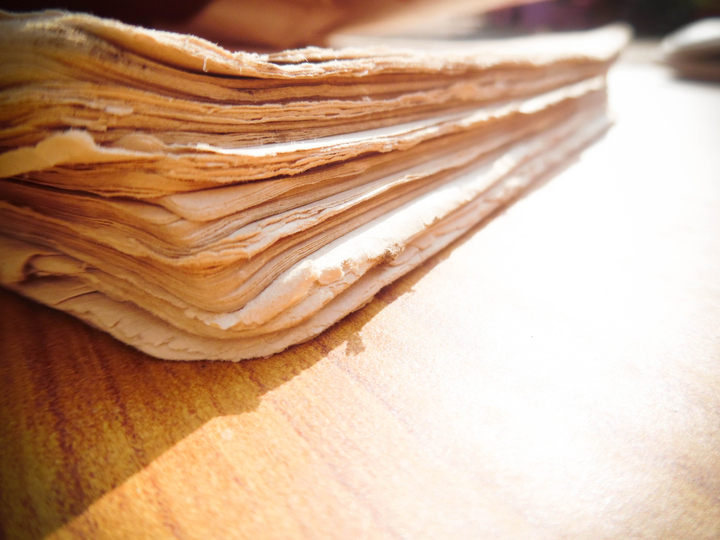
Firstly, books and manuscripts often recover well from water or fire damage. Despite their delicate nature, effective methods restore parched pages and charred covers to a legible state. This process may involve careful drying, cleaning, and even specialized treatments to remove stains and odors.
Secondly, photographs might seem irreplaceable when marred by smoke or soaked in floodwater. However, with careful handling and expert techniques, sentimental items can often regain some degree of their former clarity.
Due to water incidents, ink-filled documents such as certificates, bills, and contracts may be in danger of ink transfer. Restoration is still possible, but some faded letters may remain after the repair. We can use deacidification, cleaning, and chemical treatments to improve the legibility of inked papers.
In short, while each case will vary based on its unique circumstances and specifics, a document should only be deemed unsalvageable once examined by an experienced professional. Restoration attempts could be the difference between irreversible loss and valuable preservation.
Remember, promptly acting is crucial; quickly starting recovery efforts for destroyed documents enhances your chances of success. Seek professional help promptly to recover your important papers and memories.
Restoring Fire-Damaged Documents
Fire disasters can wreak havoc on your valuable documents. The aftermath is usually devastating, leaving many helpless to restore them. However, fire-damaged document restoration is achievable with the proper knowledge and procedures.
Cleaning Techniques for Fire Damage
Knowing how to clean fire-damaged papers is essential in any restoration endeavor. There are a couple of cleaning techniques that work effectively:
Dry Cleaning: Using a sponge or lambswool duster, delicately remove loose soot from paper surfaces without abrading them
Vacuum Cleaning: A vacuum can aid in extracting some of the debris found within charred folds or edges without further damaging these sensitive sections
Chemical Sponge Method: We might use a specialized chemical sponge (dry-cleaning sponge) to grip and lift the residue for more stubborn soot
Remember always to be gentle while dealing with fire-damaged papers, as they become incredibly brittle due to heat exposure.
Dealing with Smoke Odor
Addressing lingering smoke odors that permeate affected documents is as important as removing visual signs of fire damage. Here’s what you can do:
Natural Absorbents: Baking soda and activated charcoal commonly absorb odors due to their natural properties. The documents can be placed in a container with these substances for a few days to help determine the smell.
Use of Ozone Deodorizer: In some severe cases, professional document restoration services may propose using an ozone deodorizer. This equipment generates ozone gas that oxidizes and neutralizes the smoke molecules responsible for the unwanted scent.
Restoring fire-damaged documents might seem daunting, but it’s crucial to maintain hope and take all steps during this delicate procedure. Whether you’re dealing with cherished personal mementos or vital business documentation, each restoration attempt brings you closer to salvaging these irreplaceable documents.
Restoring Water-Damaged Documents
When dealing with water-damaged documents, it’s crucial to act promptly. Depending on the extent of the infliction and the nature of the materials involved, the damage could range from minor stains to destruction.
Immediate Actions
As soon as you discover your cherished items damaged by water, a few immediate actions will help mitigate further loss:
Careful Handling: These objects become highly vulnerable when wet and are prone to tearing or smudging. Handle them as gently as possible.
Prioritize: Identify which pieces are essential and could degrade rapidly. Items like books with coated papers might stick together if addressed slowly.
Prevent Mold: Excessive moisture leads to mold growth, which can cause irreversible conditions in paper materials. It would help if you started with mold prevention from day one by using drying techniques.
Drying Techniques
Once you’ve triaged and taken initial preventive measures, it’s crucial to dry the affected documents promptly.
Utilize Absorbent Material: A straightforward method involves placing sheets of blotting paper or unprinted newsprint under or between wet pages. This method helps absorb extra moisture and prevent further damage.
Air Dry: Simple air drying can be highly effective if room conditions have low humidity and adequate ventilation. Lay the documents flat on a clean surface, allowing them to air dry naturally. To expedite the process, use fans to promote air circulation.
Vacuum Freeze Drying: Professional services offer vacuum freeze dryers in extreme cases where documents have significant water damage, leading to swelling or warping. This process involves freezing the documents and then using a vacuum to remove moisture, preserving the integrity of the paper and ink.
By following these drying techniques and seeking professional help, you can decrease the impact of water damage.
Cleaning and Disinfecting
Understanding the best way to restore papers is crucial, but cleaning and disinfecting are equally important. After thorough drying, assess documents for contamination. Depending on the extent of the damage, employ gentle cleaning and disinfection for safety.
Post-damage cleaning involves removing water-deposited contaminants while preserving ink stability—a challenging task. For uncomplicated cases, use soft brushes to dislodge surface dirt gently. Water-stained paper may require advanced solutions tailored to the contaminant type. Disinfection is crucial to prevent further mold growth and dispersion to undamaged documents.
Restoring Storm-Damaged Documents
Let’s be honest: No one ever plans for a disaster. The chaos and panic made us overlook securing our vital documents. As we address storm-related threats to our records, remember that restoring damaged documents is possible. The process remains primarily determined by the degree of damage and how quickly you intervene.
Types of Storm Damage
Storms can wreak havoc on documents in various ways, with water damage being the most common. Flooding or heavy rainfall can saturate papers, leading to significant impairment. Not only does water soak the documents, but it also introduces mud and other contaminants, exacerbating the damage.
In addition to water damage, storms can also cause physical harm to documents through wind-borne debris. As debris flies through the air, abrasions and punctures may occur, posing a risk to any exposed papers.
The destruction caused by severe storms, such as tornadoes or hurricanes, can be catastrophic. Entire filing systems may uproot and displace, scattering documents far and wide. Retrieval efforts become challenging in such cases, requiring extensive search and recovery operations.
To mitigate document damage, it’s essential to familiarize yourself with regional weather patterns. Understanding the typical weather hazards in your area can help you predict potential risks and take proactive measures to protect your documents. By planning accordingly, you can minimize the likelihood of damage and ensure the safety of your valuable records.
Restoration Methods
Document restoration gives the most outstanding results when done fast because delaying it worsens their condition. Here are some recommendations for storm restoration of papers:
Drying Techniques: Utilize air drying and fans for circulation in low-humidity conditions
Debris Removal: Carefully remove debris to prevent further damage to documents
Professional Assistance: Seek specialized restoration services for extensive hurricane-related damage
Filing System Reconstruction: Rebuild filing systems to organize and protect recovered documents
Disinfection: Use fungicidal treatments to prevent mold growth on water-damaged documents
Protection from Further Damage
To shield your documents from weather-induced ruin, consider implementing the following strategies:
Document Replication: Regularly back up your physical files digitally or create offsite copies. This step ensures that even if the originals are damaged, you have backup copies readily available.
Waterproof Packaging: Embrace the use of water-resistant encasings for documents stored onsite. These protective coverings act as a barrier against moisture and other environmental hazards, safeguarding your documents from potential damage.
Elevated Storage: Store your documents in elevated storage units above potential flood levels. This measure helps minimize the risk of water damage in the event of flooding.
It’s essential to recognize that humans often underestimate the probability of disasters until they occur. By challenging this tendency and being prepared, you can mitigate risks and guarantee the safety of your documents.
Professional Restoration Services
Professional intervention may be required when disaster strikes in the form of fire, water, or storm damage. Some people need to pay more attention to the complexity associated with proper document restoration. They must realize that time and knowledge matter when responding to document damage. Professional assistance may help you effectively restore your significantly damaged documents.
When to Seek Professional Help
When do you seek professional help for document restoration? Here are some scenarios where it’s encouraged:
Extensive Fire Damage: When valuable documents suffer heat-induced damages like paper curling or ink charring
Water Submersion: If documents are drenched or submerged, prompt action is crucial to prevent mold and structural damage
Substantial Storm Damage: Outdoor elements like dirt and debris can cause significant harm to documents
Attempting self-restoration of severely damaged documents can risk personal injury or further damage. Complex cases require experienced professionals who understand effective preservation techniques.
What to Expect from Valley Restoration
Are you seeking top-tier assistance for these dreadful situations? Look no further than Valley Restoration. With prompt attention and proper cleanup, trained hands are available round-the-clock to ensure minimized damage to your essential documents. From fire restoration to water restoration, we’ve covered all grounds! With Valley Restoration, count on professional expertise and seamless service, transforming devastation into well-preserved documentation. Contact us today!
Water stains can be a nuisance, detracting from the appeal of your sleek glass windows, sparkling kitchen sinks, and delicate fabric on your furniture. Understanding how these unattractive markings appear and the correct removal methods can turn a stressful chore into a rewarding task with shining results.
We are here to help you effectively remove water stains from any surface. Our guide will provide the knowledge and resources needed to restore the original state of any impacted materials in your home and ensure they regain their former glory.
What Are Water Stains?
A water stain is often the residue left when water evaporates from a surface. These marks are more than an aesthetic issue; they might indicate prolonged exposure to moisture, which may deteriorate surfaces if left untreated.
Types of Water Stains
Understanding the type of water stain you are dealing with will help you appropriately target your cleaning efforts. Here are the most common water stains:
Mineral Deposits (Hard Water Stains): These often appear on glass, ceramic, and metal faucets and are caused by the minerals in hard water, such as calcium and magnesium. As water evaporates, it leaves chalky white patches requiring specific treatment methods.
Rings and Spots on Wood: These arise when moisture absorbs into unfinished wood or breaches the finish of sealed wood. They might range from minor discoloration to black circles.
Mold-Like Water Stains: These gray or black patches, commonly found in wet locations such as bathrooms and kitchens, indicate mold growth caused by excessive moisture and humidity exposure.
By distinguishing between these various forms of water stains, you will be better able to select the most effective cleaning solutions and tactics for each circumstance. Determining the type of stain your materials have lays the groundwork for their effective restoration, outlined later in this guide.
Essential Tools and Ingredients for Removing Water Stains
Having the correct equipment and products on hand can make removing water stains more manageable. Here, we will discuss several critical products for effectively addressing these stains on various materials.
Vinegar, Baking Soda and Hydrogen Peroxide
Vinegar, baking soda, and hydrogen peroxide are everyday household items that combat water stains.
Vinegar: A versatile acid capable of dissolving mineral deposits from hard water. Using vinegar to remove hard water stains produces sparkling results without harsh chemicals. This method benefits appliances like kettles and coffee machines, where you wish to avoid toxic residues.
Baking Soda: Baking soda, known for its mild abrasive characteristics, is effective at removing harder stains or those left untreated for an extended period. It’s a delicate but effective cleaning product that eliminates accumulated debris without scratching surfaces.
Hydrogen Peroxide: With disinfectant capabilities, hydrogen peroxide is an excellent choice for cleaning areas impacted by water stains while also successfully lighting darker spots.
To use these items effectively, create solutions or pastes, apply them to the stained area, and let them work before wiping or scrubbing away. When properly mixed, these agents clean and help prevent further stains by modifying the pH level of the surface to which they’re applied.
Professional Products Worth Considering
While everyday household products serve well in many cases, certain situations may require something more substantial or tailored to specific materials. Here are a few professional-grade products worth considering if persistent stains resist home remedies:
Calcium, Lime & Rust Remover (CLR): This product tackles heavier build-ups on faucets and tiles; CLR works where regular acids might not suffice.
Water Stain Remover Pastes: Specialized pastes created specifically for stubborn glass or ceramic water spots can be very successful when vinegar may fall short.
Oxygen Bleach Powders: Non-chlorine bleach solutions safely clean large areas contaminated with moldy water residues without harming colored grouts or sealants.
Choosing between homemade mixtures and store-bought cleaners is mainly determined by the severity of the stain and the material treated. Both approaches should prioritize safety by ensuring adequate ventilation for chemical cleaners and aim for success against specific stains in your environment.
Removing Hard Water Stains From Various Surfaces
Removing hard water stains in your home might be difficult. However, you may successfully restore surfaces and materials with the correct procedures and products. The following are detailed ways to remove hard water stains from many different surfaces throughout your home.
Glass & Mirrors: Combining Vinegar and Lemon Juice for Sparkling Results
Glass and mirrors often suffer most visibly from hard water build-up, which can obscure clarity and detract from their shine. To tackle this:
Mix equal portions of white vinegar and lemon juice in a spray bottle.
Apply generously to the affected glass or mirror.
Let the solution sit for five to ten minutes to dissolve minerals.
Wipe the solution away with a microfiber cloth or squeegee for streak-free results.
This simple yet powerful combination leverages acidity to break down mineral deposits, efficiently eliminating hard water stains.
Shower Walls & Tiles: Scrubbing With Baking Soda
Baking soda is an effective product for hard water stains on tiles and shower walls.
Make a paste of three parts baking soda and one part water.
Apply it directly onto the stains using a sponge or soft brush.
Scrub gently in circles until you see improvement.
Rinse thoroughly with warm water, followed by drying to prevent further staining.
Baking soda cleans surfaces and neutralizes odors, making it perfect for bathroom restoration.
Toilet Bowls: Using Hydrochloric Acid Safely for Stubborn Stains
Toilet bowls often host some of the most challenging hard water marks due to constant exposure to moisture:
Carefully pour 10% hydrochloric (muriatic acid) into the toilet bowl. Use necessary safety precautions, such as gloves and goggles, during application.
Allow it to act for about 30 minutes.
Brush vigorously using a toilet brush, then flush multiple times until all traces of acid are gone.
Always ensure good ventilation when working with strong acids like hydrochloric acid in confined spaces such as bathrooms.
Sink Basins & Faucets: A Mixture of Vinegar and Water for Shiny Fixtures
Faucets and sinks frequently accumulate spots from hard water:
Prepare a solution of half white vinegar and half warm water.
Soak a rag in this mixture and apply it extensively over the stained area. Use rubber bands or cling wrap to hold rags in place on curves or vertical surfaces.
Let the rag sit for an hour before wiping it off, then buff dry with a soft towel.
This mild acidic action helps dissolve layers of limescale without damaging fixture finishes.
Clean Solutions for Upholstery and Carpet Spots: A Vinegar and Baking Soda Fusion for Flawless Results
Water stains on upholstery and carpet can be stubborn to remove:
Sprinkle baking soda generously over the water-stained area and let it sit for 15-20 minutes to absorb moisture and loosen the stain.
Mix equal parts white vinegar and warm water in a spray bottle.
Spritz the stained area with the vinegar solution until thoroughly dampened.
Blot the area with a clean cloth or sponge to lift the water stain, avoiding harsh rubbing to prevent damage to the fabric.
Allow the upholstery or carpet to dry thoroughly, then vacuum to remove any remaining residue.
This potent vinegar and baking soda blend effectively combats water stains on upholstery and carpet, leaving them fresh and restored.
Specific Remedies for Wooden Surfaces: White and Dark Stains
Wooden surfaces may encounter both white and dark stains, each requiring a different approach:
For White Stains:
Mix equal parts vinegar and olive oil to create a solution.
Apply the mixture to the white stain using a soft cloth, rubbing it gently into the wood grain.
Let it sit for a few minutes, then wipe off the excess with a clean cloth.
Repeat until the white stain fades, then buff the wood to restore its shine.
For Dark Stains:
Create a paste by combining baking soda and water.
Apply the paste to the dark stain, spreading it evenly over the affected area.
Allow the paste to sit for several hours or overnight to penetrate the wood and lift the stain.
Wipe away the paste with a damp cloth, then dry the wood thoroughly.
If the stain persists, consider using a commercial wood stain remover following the manufacturer’s instructions.
Utilizing these targeted remedies can effectively address white and dark stains on your wooden surfaces, restoring their natural beauty with ease.
When to Seek Professional Help With Water Stains
Addressing water stains on your own may be a rewarding experience, allowing you to keep your home in pristine condition. However, there are times when DIY solutions are inadequate and professional assistance is required. Identifying these conditions will save you time and money on deteriorating materials or deep-set stains.
Signs That DIY Methods Are Not Enough
Recognizing when to call in professionals can help prevent long-term damage from water stains. Here are several indicators that your situation might require more advanced solutions:
Persistence of Stains: If you’ve tried multiple cleaning methods and the water stains stubbornly remain, it might indicate an underlying issue that surface treatments can’t address.
Size and Scope: Large areas affected by water stains or multiple locations throughout your home may suggest a bigger problem. There could be systemic issues within your plumbing or waterproofing.
Damage to Materials: When materials such as hardwood floors or drywall begin to show warping, swelling, or discoloration in addition to surface stains, this indicates underlying damage that visual cleaning will not resolve.
Health Concerns: Recurrent mold formation around water stains could pose health risks. Mold thrives in moist environments and can signify excess moisture within materials, necessitating professional mold remediation.
Working With Valley Restoration
Hiring a professional restoration company is essential when water stains persist. Valley Restoration cleans and restores homes efficiently throughout the Colorado Western Slope. With years of experience and specialized knowledge, we employ tailored techniques to address all water-related damages. Utilizing cutting-edge technology and equipment, our team ensures thorough restoration without compromising the integrity of your property.
Valley Restoration also conducts assessments to identify underlying issues such as structural damage or persistent leaks, providing holistic solutions to prevent future problems. Renowned for our prompt response to emergencies, we prioritize swift action to minimize damage and restore your peace of mind. Don’t let water stains linger—contact Valley Restoration today for efficient and reliable assistance.
Are you unsure how to remodel kitchen areas? Your kitchen is the heart of your home, where meals are shared and memories are made. And having a functional and pleasing kitchen is essential. However, the process of kitchen renovation can be overwhelming. That’s where we come in!
With our tips for kitchen renovations, you can transform your kitchen into a space that meets your needs and appeals to your senses.
Essential Kitchen Remodel Planning
Taking the time out for kitchen remodel planning can save you many headaches later.
When planning a kitchen remodel, ask yourself:
What is my budget?
What is my kitchen layout?
What are my must-haves and design goals?
As you answer, you will form kitchen remodel tips to bring your dream kitchen to reality.
Setting a Realistic Budget
Let’s start with some kitchen remodel tips on setting a realistic budget for your kitchen renovation planning. Before you even think about knocking down walls or picking out paint colors, sit down and make a solid plan for your kitchen renovation budget. Consider what you need versus what would be nice, like more cabinet space or a fancy island.
Keep referring to your budget as you go along to ensure you’re not overspending. Nobody wants to be stuck halfway through a remodel with an empty wallet, right? Considering all the little costs that can sneak up on you is crucial.
Remember, research is your best friend. Get quotes, compare prices, and clearly understand what you want. As for costs, they vary. On average, a kitchen remodel can cost around $25,000, but that number can swing depending on factors like kitchen size, materials, and whether you’re going DIY or hiring help. So, bottom line: set that budget, stick to it, and watch your dream kitchen come to life!
Assessing Your Current Kitchen Layout and Functionality
Assessing your kitchen’s layout and functionality is essential in kitchen remodel planning. Before envisioning your dream kitchen, take a moment to understand how your current space functions. Look around and note what works well and what doesn’t. Which appliances do you find yourself using most frequently? How does the flow of traffic move through the space?
Answering these questions will give you valuable kitchen remodel tips to make your kitchen operate more efficiently. You should constantly tailor your kitchen design to fit your family’s unique lifestyle. After all, a kitchen should be aesthetically pleasing, practical, and functional.
Identifying Must-Have Features and Priorities
Another of our kitchen renovation tips is identifying must-have features and priorities in kitchen remodel planning. Everyone’s kitchen wish list is different. Some folks crave a spacious island for family gatherings, while others can’t wait to install sleek, energy-efficient appliances. Figuring out what you want in your kitchen before renovating is crucial.
So, take some time to jot down your must-haves and priorities. You may want extra storage for all your gadgets or a cozy breakfast nook for lazy Sunday mornings. Whatever it is, make sure it aligns with your lifestyle and preferences. By identifying your kitchen priorities upfront, you’ll streamline the remodeling process and ensure your dream kitchen becomes a reality.
Researching Design Inspiration and Trends
Researching design inspiration and trends is one of our crucial kitchen remodel tips. A world of unique and innovative kitchen designs is waiting to inspire you. Take, for instance, the rise of open shelving or the integration of smart technology into kitchen appliances. These trends can transform your kitchen into something truly fantastic.
Our kitchen renovation tips aren’t just about following the latest fads; aesthetics matter, too. Considering the overall look and feel of your kitchen is vital. So, take some time to research different design styles and trends. Also, consider asking renovation professionals for their opinions on your desired designs. After researching, you’ll find the inspiration for your dream kitchen.
Maximizing Space and Functionality
Picture this: You’re gearing up to whip up breakfast for the family, but as you enter the kitchen, it feels more like a crowded subway at rush hour. Everyone bumps into each other, and there’s barely room to maneuver. It’s a chaotic scene, not the peaceful cooking experience you envisioned.
Maximizing space and functionality in kitchen remodel planning is crucial. By prioritizing space optimization and functionality, you elevate your cooking experience and enhance the overall flow and accessibility of your kitchen. When planning a kitchen remodel, focus on maximizing your space; you’ll thank yourself in the future.
Optimizing Storage Solutions for a Clutter-Free Kitchen
Have you ever found yourself rummaging through drawers and cabinets for a particular pot or pan? We’ve all been there! However, you can banish kitchen clutter for good by maximizing storage space. Picture pull-out shelves offering easy access to your cookware or vertical dividers, keeping your baking sheets organized.
Optimizing storage is one of the most vital aspects of kitchen remodel planning. You can tailor your storage solutions to your cooking style and lifestyle. With a thoughtfully organized kitchen, meal prep becomes a joy rather than a chore.
Considering Traffic Flow and Clearances
Our kitchen remodel tips address the critical aspects of traffic flow and clearances. Grab your tape measure and start mapping your space, ensuring ample room for movement. It’s all about avoiding those pesky objects that can disrupt the flow of your kitchen activities.
Consider the layout you’ve chosen and make adjustments accordingly. As you measure, pay special attention to the clearances around areas like islands, ensuring enough space for cooking and socializing. Remember those corner clearances, too; you don’t want your cabinets or appliances to feel cramped. And when it comes to doors and drawers, think about their swing direction to prevent inconvenient collisions.
Another of our kitchen remodel tips is to remember clearances for your appliances. Sticking
to the recommended clearance measurements is best, whether it’s the fridge, oven, cooktop, or sink. Remember to create a convenient landing zone near the microwave; those quick food transitions will thank you later.
Incorporating Smart Kitchen Technology
When it comes to kitchen renovation tips, consider incorporating smart kitchen technology. Upgrading your space with modern gadgets can truly elevate its functionality and convenience. As you dive into kitchen remodel planning, consider adding smart taps and trash cans to streamline your daily tasks.
Also, integrating smart home consoles like Alexa and smart lighting can further enhance your kitchen experience. With the right technology, your kitchen can transform into a well-oiled machine, making cooking and cleaning a breeze.
Design Elements for a Stylish Kitchen Upgrade
When diving into kitchen remodel planning, remember these essential kitchen renovation tips. Focus on timeless design elements and efficient lighting, and choose color schemes and finishes that speak to you. You’ll create a kitchen you adore by paying attention to these design tips for remodeling a kitchen. Having a kitchen you love makes cooking and gathering with loved ones even more enjoyable.
Choosing Timeless vs Trendy Design Elements
Regarding kitchen renovation tips, it’s essential to consider the choice between timeless and trendy design elements. While trendy styles might seem appealing now, opting for timeless designs can be a smarter move in the long run.
Avoiding overly trendy finishes ensures your kitchen remains stylish for years to come. Sure, some trendy elements may stick around, but it’s better to base your decisions on what you envision for the future.
Your kitchen remodel planning should prioritize durability and longevity. After all, your kitchen is an investment that will withstand changing tastes and lifestyles. So, aim for a timeless look to ensure your kitchen remains a beloved space for years.
Lighting Strategies for Ambiance, Task, and Decor
Another of our kitchen renovation tips is prioritizing lighting strategies for ambiance, task, and decor. Kitchens need versatile lighting solutions that look great and serve multiple purposes. Our kitchen remodel tips consider every aspect, including how you illuminate the space.
Start with ambient lighting to create a warm, inviting atmosphere throughout the room. Task lighting is essential for specific activities like cooking or dining, so think about pendant lights or wall sconces to brighten those areas. And remember decorative lighting to add personality and flair to your kitchen.
Whether highlighting artwork or architectural features, decorative lighting lets your style shine through. So, a great one of our kitchen remodeling tips: remember to layer your lighting for both functionality and aesthetics.
Selecting Color Schemes and Finishes that Reflect Your Style
As you explore kitchen remodel planning, one of the essential kitchen renovation tips is selecting suitable color schemes and finishes. Your kitchen’s aesthetic should mirror your style and preferences. However, it’s crucial not to overwhelm the space with too many hues. Instead, opt for a focal point to infuse your chosen colors strategically.
Dark color schemes can make small spaces feel even more cramped, so stick to softer shades to open the room visually. Pastels are gaining popularity again, bringing a sense of lightness to tight spaces. Utilize natural light by avoiding heavy window treatments and letting your chosen colors bask in the sunlight. With careful consideration of color and finishes, your kitchen renovation will reflect your personality and taste.
Practical Tips for Efficient Renovation Execution
Ready to revamp your kitchen? Let’s talk practicality! When planning your kitchen remodel, it’s essential to consider how your tasks will work out in the long run. A practical approach means smoother execution, returning you to your kitchen faster. So, below, we have some tips for efficiently renovating a kitchen.
Scheduling and Sequencing Renovation Tasks Effectively
Regarding our kitchen remodel tips, scheduling and sequencing renovation tasks effectively is vital. You don’t want to paint before installing cabinets. Imagine the hassle of having to repaint because of accidental scratches or dings during cabinet installation.
You should plan your tasks logically. Start with structural work, then move on to plumbing and electrical, followed by installations like cabinets and countertops. Finally, finish with painting and cosmetic touches. This way, you avoid unnecessary rework and ensure a smooth renovation process. Following these kitchen remodel tips will save time, money, and stress, leaving you with a beautifully renovated kitchen in no time.
Managing Unforeseen Challenges During the Remodel Process
During kitchen remodel planning, expect unforeseen challenges and be prepared. One common challenge is unexpected structural issues, like water damage or faulty wiring. To handle these, have a contingency fund and a flexible timeline.
Another challenge might be delays in materials delivery, so stay in communication with suppliers and be ready to pivot if necessary. Also, consider the possibility of design changes mid-project, which can impact both time and budget. Stay calm, assess the situation, and adjust your plans accordingly. Your kitchen renovation will stay on track by anticipating and managing these challenges effectively.
Energy-Efficient Appliances and Lighting Options
Another of our kitchen renovation tips is considering energy-efficient appliances and lighting options. These are better for the environment and your wallet. Energy-efficient appliances consume less electricity, resulting in lower energy bills over time.
Additionally, LED lighting options use significantly less energy than traditional bulbs, reducing your household’s energy consumption. By incorporating these efficient choices into your kitchen remodel planning, you’re contributing to a greener planet and saving money in the long run. So, when shopping for appliances and lighting fixtures, prioritize energy efficiency for a more sustainable and cost-effective kitchen upgrade.
Avoiding Overpersonalization for Resale Purposes
Are you thinking about selling your home someday? Here’s another one of our kitchen renovation tips: avoid over personalization. Over Personalizing your kitchen can turn off potential buyers. For instance, choosing extremely bold or niche design elements might appeal to only some.
Additionally, trendy but polarizing color schemes or unconventional layouts could limit your pool of interested buyers.
Remember, the goal of kitchen remodel planning should be to create an inviting and functional space for a broad range of tastes. By avoiding over personalization, you increase the likelihood of attracting more buyers and securing a successful sale when the time comes.
The Best Kitchen Remodel Tip: Hire Professionals
One of our most crucial kitchen renovation tips is to hire professionals. By seeking kitchen renovation help, you can manage the process with others, which can be stressful and demanding. Our team at Valley Restoration has trained professionals in construction, plumbing, electrical work, and more.
We will help you create your kitchen renovation plan while advising you on designs and strategies to maximize the space. With our expertise, we’ll ensure your kitchen becomes even more than what you’ve envisioned. Don’t hesitate to work on your kitchen remodeling—contact us today!
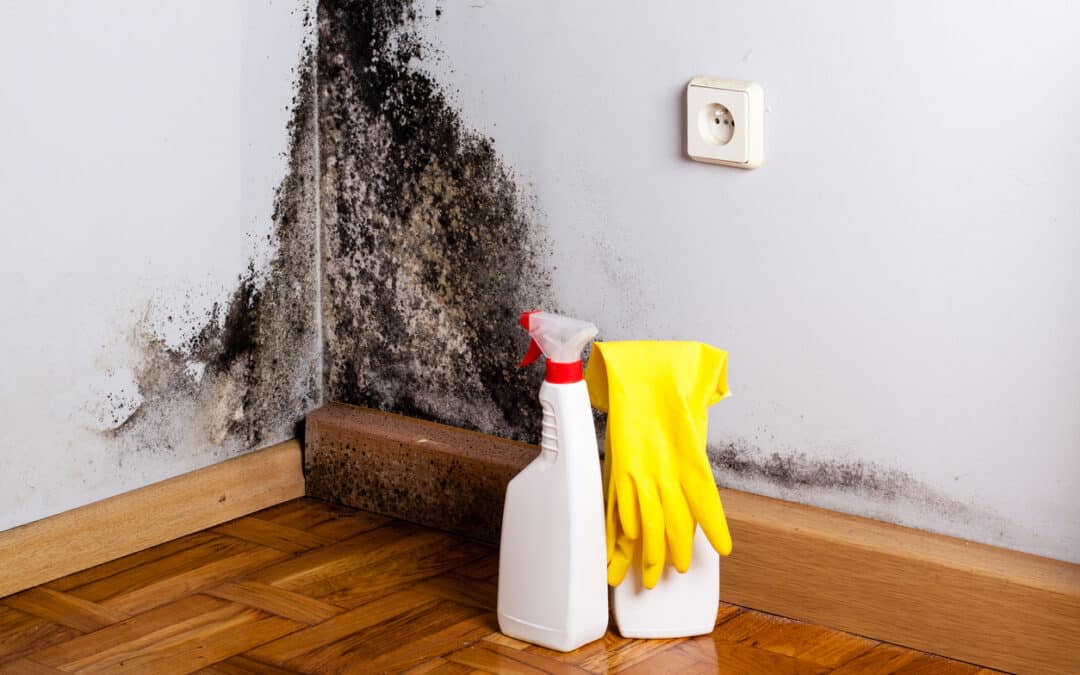
No one wants to think about mold. It’s gross and harmful to your health. Unfortunately, you have no choice but to think about it when it invades your home or workspace—you need to remove it as quickly as possible.
By understanding the basics of mold and learning about the most common types of mold that may appear in your home, you can easily identify mold habitats before the growth even starts. This will help you avoid mold growth and take the appropriate steps to mitigate mold growth in your home or workplace.
Understanding Mold
Mold is a non-green plant that grows in damp and humid environments. It reproduces and spreads steadily through the air and land in favorable growth environments. As mold grows, it releases tiny spores that cause health problems for most individuals.
Mold can be separated into three main types: allergenic, pathogenic, and toxigenic. Allergic mold is the most common type. This mold typically causes symptoms like nasal congestion, sneezing, coughing, and itchy/watery eyes. In some cases, it can induce asthma symptoms such as wheezing, shortness of breath, and chest tightness.
Pathogenic mold has adverse health conditions as it causes infections. It’s most dangerous to those with weak immune systems but can also severely impact children and older adults. On the other hand, toxigenic mold generates toxic components such as mycotoxins that are dangerous to a person’s health. Toxigenic mold also causes dizziness, nausea, and neurological damage.
Unfortunately, mold thrives in high-moisture locations throughout the home, including basements, kitchens, and bathrooms. Furthermore, it grows and spreads in organic materials often collected inside homes, such as fabric, wood, and paper. Because of this, all homeowners need to understand the most common types of mold they may encounter in their homes so they can be on the lookout.
16 Common Types of Mold That May Grow in Your Home
1. Chaetomium
Chaetomium mold is a type of fungus that can appear as a velvety growth in different color ranges such as white, grey, or greenish-black. The mold produces a musty odor accompanied by dark-colored, spherical structures called perithecia. Chaetomium forms in areas with moisture and organic material that it can feed on. The mold often grows in highly humid areas such as bathrooms, kitchens, and basements.
Chaetomium falls in the allergenic mold category. This household mold is not considered dangerous but can lead to respiratory problems. Allergic reactions, respiratory issues, and skin irritation are some of the symptoms of Chaetomium exposure.
You can prevent Chaetomium growth by preventing moisture in your home. If you see this mold, do not touch or interact with it; this can help it spread even further.
2. Stachybotrys
Stachybotrys is also known as black mold. Stachybotrys is a type of fungus that appears as a greenish-black slimy growth. It produces a musty odor. The mold is found in areas with high humidity, such as bathrooms and basements.
Stachybotrys mold falls under the toxigenic mold category. It produces mycotoxins which can cause serious health problems upon exposure. Exposure to Stachybotrys causes various health-related issues such as headaches, dizziness, respiratory issues, and neurological damage in some extreme cases.
Stachybotrys mold forms on surfaces that have been damp for a prolonged period, like areas affected by leaks and flooding. Stachybotrys mold is often associated with severe water damage caused by bursting water pipes, hurricanes, and flooding. If you have experienced any type of water damage, it’s best to call in professionals like Valley Restoration and Construction so we can assess your home for this toxic mold.
3. Trichoderma
Trichoderma mold is a fungus. It appears in color ranges such as green, white, or yellowing growth and has a woolly texture. The mold grows on different surfaces, including soil, plants, and building materials.
Trichoderma mold frequently grows in damp areas and places with high humidity, such as the kitchen or crawl spaces underneath the home. Trichoderma mold can also appear in buildings that have experienced prolonged water leaks and homes with poor ventilation.
Trichoderma is classified as an allergenic mold but exhibits pathogenic properties. Exposure to Trichoderma mold causes allergic reactions, sneezing, runny nose, and skin rashes. Trichoderma can also cause respiratory problems in people with weakened immunity.
To prevent Trichoderma mold effects, consider addressing moisture problems in your home. You may also want to evaluate your home ventilation system and seek options to mitigate moisture accumulation.
4. Alternaria
Alternaria mold appears as a black-greenish-brown fuzzy growth. Alternaria mold grows on soil, plants, and building materials such as drywall and insulation. Often, Alternaria mold thrives in areas with high humidity levels. This means it can grow on surfaces that experience extended exposure to moisture due to water leakage and flooding. However, older homes with poor ventilation and high moisture levels can also see Alternaria growth.
Alternaria is an allergenic mold, and it contains some pathogenic traits. When exposed to Alternaria mold, an individual may experience allergic reactions such as skin rashes, runny nose, and sneezing. Exposure to Alternaria mold can also lead to respiratory problems for some individuals, especially those with underlying health conditions.
To address Alternaria mold infestation, consider ventilating homes properly and installing proper drainage to prevent stagnant water and cases of moisture in an indoor environment.
5. Ulocladium
Ulocladium mold is from the fungus kingdom and has a dark brown to olivaceous black growth, and it resembles the Alternatria mold. It is often found in decaying plants, wood, soil, and dust and thrives in moist and damp areas. It feeds on vegetables, especially nuts, beans, and cereals. Ulocladium mold can grow in low-humid regions and is mainly found outdoors. However, this doesn’t mean you can’t find it in your home.
Ulocladium mold falls under both allergenic and pathogenic categories. It causes an allergic reaction in humans, including eye irritation, sneezing, and skin rashes. Because it is a pathogenic mold, it can also lead to respiratory complications, such as asthma and bronchitis.
Indoor environments should be made waterproof to prevent moisture from accumulating in the house to avert Ulocladium mold spread. Contacting professional mold remediation is essential to carefully and safely remove molds from living settings.
6. Serpula
Serpula appears as white, gray, or yellowish growth. It has a cottony texture. It commonly crops up in damp areas and thrives in spaces with high humidity, such as bathtubs and kitchens.
Serpula is categorized either as allergenic or pathogenic. Exposure to Serpula mold automatically causes an allergic reaction, such as skin rashes and sneezing to an individual. Furthermore, a person will suffer from respiratory-related problems such as asthma and bronchitis on exposure to serpula mold.
Serpula is a dangerous mold. You must handle it carefully. However, you can prevent this mold from growing by regularly ventilating high-moisture areas and checking for water damage regularly.
7. Mucor
Mucor mold appears in either white or grayish growth with a fluffy texture. These molds grow on various surfaces, such as building walls, decaying plant matter, soil, and food.
People should avoid exposure to mucor molds because of the dangers that can come from prolonged exposure. Living alongside Mucor can lead to respiratory problems such as bronchitis and asthma. The mycotoxins it produces can also cause liver damage, pulmonary hemorrhage, and even death.
8. Aspergillus
Aspergillus mold appears as green, yellow, or blackish growth with a powdery texture. It grows on various surfaces and building materials, such as drywall and carpet. Although it can grow in bathrooms and kitchens, Aspergillus often appears in home ventilation systems, making it especially dangerous.
This mold is pathogenic and allergenic. Exposure to Aspergillus can cause an allergic reaction, asthma, and sinusitis. However, its mycotoxins are carcinogenic, causing lung infections. To remedy Aspergillus mold, ensure the indoor living environment is moisture-free and repair damaged leaking water pipes.
9. Penicillium
This type of mold looks like a blueish or greenish growth and has a fluffy texture. The mold forms on various surfaces, including food, carpet, soil, and wallpaper. Humid and damp environments contribute to its formation and feed its growth. The mold can also spread through ventilation systems due to its presence in indoor air.
Upon contact with Penicillium mold, some people experience allergic reactions, including itchy eyes, coughing, and sneezing. It can also cause hypersensitivity pneumonitis, asthma, liver damage and cancer, especially if you let it continue to grow in your home.
10. Aureobasidium
The mold entails a suede-like texture and appears as a black growth. You often see it on windowsills, showers, and damp walls. It also feeds on paint, wallpaper, and other building materials.
Aureobasidium is an allergenic mold. It results in various allergic reactions in individuals, including itchy eyes, coughing, and sneezing. In addition, it also contributes to respiratory problems such as asthma and hypersensitivity.
The easiest way to avoid Aureobasidium growth is by ensuring that your home is properly sealed so water can’t enter around windows or through the walls. You can also use dehumidifiers in older homes to alleviate dampness in the air.
11. Acremonium
Acremonium is a toxigenic mold that appears grey, white, or pinkish and is usually fluffy or powdery. It forms in basements, kitchens, and bathrooms.
This mold usually generates mycotoxins that cause respiratory problems and skin irritation. Due to its adverse characteristics on individuals’ health, exposure to it for a long time can result in other critical health conditions, including organ damage.
If you have a basement, you should regularly measure the moisture levels and check for potential places where moisture can enter your home. Fixing these issues and adequately caring for other areas in your home that produce water will help prevent Aureobasidium growth.
12. Cladosporium
This allergenic mold looks black or green with a velvety texture. It can grow outdoors or indoors and often appears on moist surfaces where water sits for long periods of time.
Prolonged Cladosporium exposure significantly affects an individual’s health. It causes everything from allergy symptoms to respiratory problems such as hypersensitivity pneumonitis.
13. Fusarium
Fusarium is pinkish, whitish, or reddish with cotton texture. Additionally, this toxigenic mold produces yellow or green spores. Fusarium forms in wet environments such as plant debris, damp building materials, and soil. It also contaminates fruits, grains, and vegetables.
Many health effects are associated with toxins, including gastrointestinal, respiratory, and skin issues. Prolonged exposures to Fusarium can also cause neurological problems and cancer, due to the harmful mycotoxins it produces.
You can prevent mold growth by solving the moisture issues in the indoor environment.
14. Aspergillus species
This mold appears in many colors, including white, green, gray, yellow and black, and also has a velvety texture. Some species of this mold are powdery and woolly.
The mold’s species are found in decaying vegetation and other organic materials such as compost and food. They also grow in wet environments such as bathrooms and damp basements.
Aspergillus fumigatus, a species of Aspergillus, has adverse effects on health as it causes respiratory infections. It also causes allergies and invasive diseases. The mold also generates mycotoxins that contaminate food products. When ingested, this mold can pose serious health risks.
To prevent its growth, one should control the moisture levels, maintain proper ventilation and repair any leaks.
15. Cryptococcus neoformans
It falls under the category of fungus although being classified in the group of molds as it bears similar characteristics as the latter. It has a spherical structure and is small in size. It also has a smooth surface and appears gray or brown. It usually forms on bird droppings and indoor surfaces such as ventilation systems, windows, and doors. It is pathogenic and results in infections. Those with underlying health conditions or a weakened immune systems should avoid all exposure to Cryptococcus neoformans.
16. Histoplasma capsulatum
Histoplasma capsulatum is also a type of fungus but is categorized with molds. The fungus has a yeast-like structure. It is small and round. The fungus gets into the body through inhalation in areas it has developed. Histoplasma capsulatum can lead to severe health conditions such as histoplasmosis that majorly affects individuals with weak immune systems. It also affects many body organ systems and is described as systemic mycosis.
Don’t Mess With Mold: Let The Experts Clean It Up
Unfortunately, every mold on this list can quickly spread within your home once it begins growing. This is why it’s important to take appropriate precautions and seek professional help as soon as you see any signs of mold in your home.
At Valley Restoration, we take mold very seriously. Our team is Applied Microbial Remediation certified, which means we will do all that we can to make sure the contaminated area is treated properly so you can get back to enjoying your home. We will never walk away from a job until we’ve accomplished the right amount of mold remediation to meet our high standards.
If you need help removing mold from your home or want an inspection, give us a call at 970-964-4437.
Have you ever faced a kitchen grease fire? We know how traumatic and stressful it can be. While fire can visibly damage appliances and surfaces in your home, the smell of grease smoke can make breathing difficult. But fear not! We’ve covered you on grease fire cleanup! With these tips, you can learn how to get rid of the grease smell in your house, clean surfaces, and avoid grease fires in the future.
What is a Grease Fire?
Grease fires devastate ovens and can engulf entire kitchens, posing grave risks to life and property. A kitchen grease fire erupts when cooking oil overheats and reaches its ignition point. The intense heat generated poses immediate danger and fills the kitchen with thick clouds of grease smoke. Avoiding grease fires is crucial, as they can cause extreme trauma when they occur.
Causes of Grease Fires
Understanding the causes can prevent a kitchen grease fire from happening. A kitchen grease fire can commonly arise from several circumstances, including:
Excessive Temperatures: Overestimating the required cooking temperature can cause the oil to reach its ignition point and trigger a blaze.
Neglecting Food: If you leave food unattended while cooking, it can overheat and potentially ignite.
Wearing Loose-Fitting Clothing: Loose attire may come into contact with open flames or hot surfaces while cooking.
Not Paying Attention: Placing combustible materials such as paper towels, dish towels, or oven mitts too close to the heat source can lead to a significant fire.
How Can I Safely Extinguish a Grease Fire?
A kitchen grease fire produces intense heat and grease smoke, posing immediate risks to safety and property. Swiftly tending to a kitchen grease fire can prevent its escalation so you can avoid intense grease fire cleanup.
Extinguish Kitchen Fires with Grease By:
To effectively combat a grease fire, follow these steps:
Turn off the burner immediately to halt the heat source.
Cover the fire with a metal lid or cookie sheet to remove its oxygen supply.
Apply baking soda or salt directly onto the flames for effective suppression.
As a last resort, utilize a Class B or Class K fire extinguisher to quench the blaze.
Call 911 to confirm the fire is entirely extinguished and assess whether your home is safe.
Following these steps, you can safely extinguish a kitchen grease fire and mitigate its potential hazards. Remember, swift intervention can save time and money from grease fire cleanup.
What to Avoid When Putting Out a Kitchen Grease Fire:
When dealing with a kitchen grease fire, avoiding specific actions is essential to ensure you don’t cause more damage. Here are some things to avoid when extinguishing a kitchen grease fire:
Never Use Water: Oil and water do not mix. Pouring water on a grease fire can make the grease splatter, spreading the flames rapidly.
Avoid Fanning the Flames: Attempting to fan the fire can introduce more oxygen, rapidly escalating the flames and spreading grease smoke throughout the kitchen.
Do Not Open the Oven: A fire in an oven has a secluded spreading zone. Opening the oven door can introduce oxygen, causing the fire to flare up and potentially spread.
Do Not Use a Cloth to Smother the Fire: Smothering a grease fire with a cloth can result in the fabric catching fire, potentially causing the flames to spread further.
Do Not Move the Burning Pan: Attempting to move a pan or pot that is on fire can cause the hot grease to spill, which can spread and potentially cause burns.
Do Not Leave the Kitchen: Ignoring a grease fire or leaving it unattended, even briefly, can allow the fire to spread rapidly.
How to Get Rid of Grease Smell in House
Eliminating the grease smoke smell is crucial as it affects the indoor air quality. Grease smoke smells may also cause respiratory discomfort and trigger allergies. Moreover, the smell of a kitchen grease fire can permeate fabrics and upholstery, causing unpleasant odors throughout the house. Proper grease fire cleanup ensures a safe and healthy living environment for you and your family. Below, we mentioned how to get grease smell out of houses.
Increase Ventilation
Increasing ventilation is necessary to mitigate the lingering smell of grease smoke in the kitchen. Opening windows or using exhaust fans enhances airflow, facilitating the dispersion of odors. This simple yet effective solution helps improve air quality by replacing stagnant air with fresh outdoor air.
While it may not entirely eradicate the smell, it significantly reduces its intensity, making the kitchen environment more pleasant.
Fill Bowls With Vinegar
Believe it or not, vinegar can combat the scent of grease smoke in the kitchen. It absorbs and neutralizes unpleasant odors, which effectively freshens the air. It is also a safe alternative to chemical-based air fresheners.
To use this method, fill several bowls with vinegar and place them around the kitchen, focusing on areas where the odor is most concentrated. Leave the bowls out and give the vinegar time to work its magic.
Clean Surfaces & Appliances
You will also need to clean surfaces and appliances thoroughly in order to remove the grease smell from your home. You can use cleaning products like trisodium phosphate, degreasers, and dry soot sponges, which effectively remove soot.
Applying the cleaning agent initially and giving it a thorough rinse will make the cleanup procedure run more smoothly. Once the surface has dried, clean it again and continue the rinsing and drying process once more to ensure all the soot is removed.
Next, wipe down countertops, appliances, and utensils. Also, ask a professional to verify your appliances are safe to use, especially if they were in direct contact with any flames or smoke.
Finally, wash fabrics like curtains and towels to eliminate all traces of grease smoke odor. This grease fire cleanup process effectively neutralizes the smell of grease smoke, leaving the kitchen smelling fresher.
Apply Baking Soda
To combat the lingering odor of grease smoke in the kitchen, apply baking soda generously. Sprinkle it on affected areas like ovens or stovetops. Baking soda, much like vinegar, effectively absorbs and neutralizes odors. By utilizing baking soda, you address the root cause of the odor. Regular application helps maintain a pleasant atmosphere and prevents the recurrence of grease smoke smells.
Tips on Grease Fire Cleanup
Dealing with the aftermath of a kitchen grease fire can be stressful and tiresome. However, we have highlighted tips on how to clean after a fire to ensure the effective removal of soot, smoke odor, and damage.
Turn Off Your Air Conditioning
During grease fire cleanup, it’s crucial to turn off the AC to prevent the spread of soot and smoke odor particles throughout the house. Additionally, changing the filters of the HVAC system and refrigerator helps prevent the circulation of contaminated air and reduces the chances of odor recurrence.
Check the Microwave
When dealing with a kitchen grease fire, it’s essential to assess the condition of appliances, such as the microwave, especially near the fire. Examine the surface for any signals of damage or soot residue.
Clean the surface meticulously using appropriate cleaning products if the microwave appears salvageable. However, if the damage is extensive or there are safety concerns, it’s vital to seek a professional evaluation or consider replacing the appliance.
Clean Cabinets and Drawers
Cleaning cabinets and drawers is paramount after a kitchen greases fire to eliminate smoke and soot particles. Thorough cleaning is required inside and behind cabinets and drawers to prevent permanent staining and lingering odors.
Begin by emptying their contents and then wiping down surfaces with a degreaser solution. Pay close attention to areas with heavy staining, and use a combination of degreaser and deodorizer for stubborn odors. For cabinets exposed to smoke and soot, follow a strict cleaning regimen and consider professional assistance for extensive damage.
Thoroughly Clean the Oven
It is vital to know how to clean ovens after grease fires. Clean the oven thoroughly after an oven fire incident to prevent grease buildup or food residue accumulation. Grease oven fires often originate from neglected oven cleaning. To guarantee safety and avoid any fire hazards, cleaning the oven thoroughly and having an appliance restoration company inspect it is advisable.
Contact Valley Restoration for Kitchen Grease Fire Cleanup
Although the above tips provide great advice for cleaning up minor grease fires, more extensive accidents require restoration experts like our team at Valley Restoration. We have the knowledge and equipment to handle grease fire cleanup and restoration effectively.
We offer swift on-site assistance within the first hour of your call. When we arrive, we will evaluate the situation and recommend remediation, appliance replacement, and other restoration needs. Valley Restoration can be your trusted partner. Don’t manage a kitchen grease fire alone; contact us today and restore your home to pre-fire conditions!
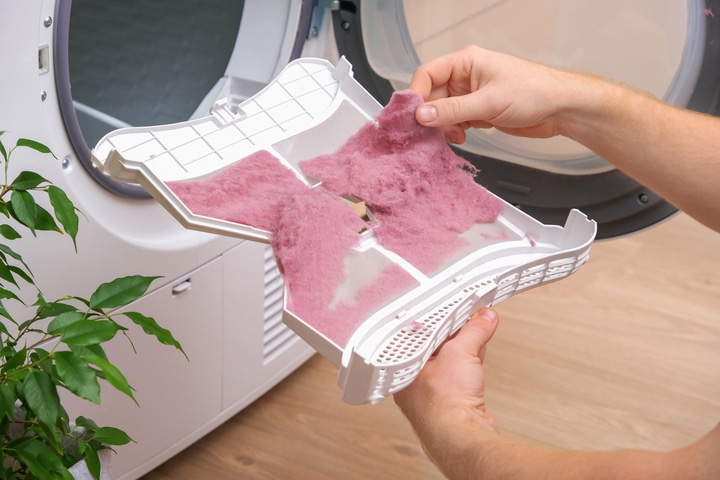
Although most people assume lint buildup isn’t a big deal, it can actually cause catastrophic results within your home. According to Consumer Reports, over 13,000 home fires are caused by clothes dryers each year [1]. Furthermore, over ¼ of these fires are the direct result of lint accumulation.
The team at Valley Restoration & Construction knows from firsthand experience how devastating dryer fires can be. Therefore, we want to help you ensure dryer safety within your home by explaining the contributing factors to dryer fires and what you can do to prevent dryer vent fires in your home.
Dryer Fire Statistics
Dryer lint build-up can lead to a dangerous situation, not just decreased dryer performance. Ignoring proper maintenance increases the potential for a devastating dryer lint fire.
Dryer lint fires occur more frequently than you might realize. As we previously mentioned, clothes dryers cause approximately 13,800 fires annually, and 27 percent of these fires are due to lint build-up [1].
In addition, homeowners pay around $200 million in property damage yearly due to dryer fires [2]. The frequency and damage of these fires highlight the urgent need for homeowners to address this overlooked aspect of fire prevention.
Causes of Dryer Fires
Dryer fires result from a number of causes. However, most of these potential threats can be avoided if you know what you’re looking for. Proactive measures, informed by awareness, effectively mitigate household fire hazards.
Below are some of the most common causes of dryer fires.
Lint Build-Up
When people ask, “Can dryer lint cause a fire?” the answer is always yes. The accumulation of lint is a common cause of dryer fires. Generally, lint build-up happens when a person forgets to clean out the lint trap of their dryer regularly. As dryers accumulate lint, airflow restriction occurs, which is evident when clothes take longer to dry.
Over time, lint can accumulate in ducts, forming a flammable layer and increasing temperature. This heightened temperature poses a severe risk of fires, as it may compromise the proper functioning of the high-limit thermostat. The high-limit thermostat is a crucial safety feature that shuts off the heating element to prevent extreme temperatures.
Lint build-up becomes a time bomb, as dryer lint fires can erupt with the slightest spark.
Clogged Dryer Ducts
Clogged dryer ducts present a critical safety concern in households due to the alarming risk of dryer lint fires. Debris, lint, dust, and small pocket items can cause clogs. Clogged dryer ducts are likely to cause clothes dryer fires, regardless of the substance.
Neglected maintenance amplifies the dangers, as the accumulated materials become highly flammable, resulting in catastrophic fire incidents. This destruction can lead to financial losses and jeopardize the safety of occupants. It’s crucial to regularly clean dryer traps and ducts to prevent potential clothes dryer fires.
Inadequate Ventilation
An issue with the dryer vent exhaust might drive clothes that take too long to dry or feel hotter than usual. Inadequate dryer ventilation poses severe risks, contributing to potential clothes dryer fires.
When the exhaust installation points indoors, it can cause dryer vent fires. Poorly done dryer vent installations can also cause indoor air deterioration and mold build-up. Optimal dryer ventilation is crucial, reducing fire risk by ensuring proper airflow.
Overloading
Overloaded clothes dryers are a significant contributor to clothes dryer fires. When users stuff their dryer with excessive clothing or bedding materials, it hinders the proper circulation of air within the dryer. This obstruction impedes the appliance’s ability to dissipate heat effectively.
The consequences of overloading extend beyond the inconvenience of damp or improperly dried items. The accumulated heat can escalate to ignition, resulting in clothes dryer fires.
Moreover, overloading the dryer heightens the potential for dryer vent fires. The compromised airflow can extend to the entire ventilation system. The increased pressure on the vent may lead to blockages and, in turn, contribute to the ignition of lint and debris, creating a dryer vent fire.
Preventing Dryer Fires
Clothes dryer fires are potential hazards and serious threats that necessitate proactive safety measures. However, you can quickly implement these recommended prevention tips to guarantee your family’s safety when using dryers.
Regular Cleaning of the Lint Filter
Lint build-up is one of the most common causes of dryer lint fires. Only removing dryer lint once a week or once a month poses safety risks. You should remove lint after each cycle for optimal safety and reliability. Neglecting this task increases clothes dryer fire risks.
Replacing Accordion-Style Ducts with Rigid Ones
You can also increase your home’s safety by replacing your dryers’ accordion-style ducts with rigid ones. Accordion-style or flexible ducts can collect lint very quickly. On the other hand, the inflexibility of rigid ducts prevents lint build-up, minimizing the chances of clothes dryer vent fires.
This simple switch reduces the risk of a dryer on fire and improves your dryer’s overall efficiency. Make this upgrade a priority for a safer and more efficient laundry experience.
Scheduling an Annual Cleaning of the Dryer Duct
Regular maintenance is crucial in preventing clothes dryer vent fires. As mentioned, lint and debris can accumulate in the duct, creating a potential hazard for dryer vent fires.
Having a professional cleaning annually effectively reduces the risk of clothes dryer fires.
This routine maintenance ensures your home’s safety and improves your dryer’s overall efficiency. Make it a priority to include dryer duct cleaning in your annual maintenance checklist to minimize the potential dangers of dryer vent fires.
Insurance Coverage for Dryer Fires: Understanding Subrogation
Clothing dryer fires can be costly due to the severe damage. Having dryer fire insurance coverage is essential for your financial protection. Insurance companies use subrogation to actively recover costs incurred due to damages caused by dryer fires.
Subrogation in Dryer Fires
Subrogation is a fundamental aspect of insurance, particularly in dryer fires. In the event of a dryer fire, subrogation serves as the mechanism through which an insurance company can recover the costs associated with the damages.
Insurers conduct thorough investigations into the causes of dryer fires, including the factors of dryer lint fires or dryer vent fires. Subrogation becomes especially relevant in cases where negligence, faulty equipment, or other external factors contribute to the incident. By holding responsible parties accountable, subrogation ensures insurance coverage and that the financial burden doesn’t solely fall on the policyholder.
Reacting to a Dryer Fire Incident
Reacting to a dryer fire incident can induce panic. Knowing how to respond is vital to mitigate home damage and ensure everyone’s well-being at home. The aftermath of an accident is challenging; in some cases, seeking assistance from fire restoration professionals is necessary.
Understanding proper reactions to these fires prepares you for emergencies and helps calm anxiety during such stressful situations. Having a plan is vital, empowering you to navigate the chaos with a clear mind to safeguard yourself and your loved ones. Stay informed, stay calm, and proactively address potential dryer fires, ensuring your home is secure.
Immediate Response to a Dryer Fire
Swift action is crucial in a dryer lint fire because these fires can escalate rapidly. Lint is highly flammable, and once ignited, it can lead to a fast-spreading fire. Individuals can increase their chances of successfully containing the fire and protecting themselves and their property by taking immediate action. Here is what you should do during a dryer fire:
Consider signs like smoke indicating a potential dryer lint fire.
Keep the door closed to contain the fire within the appliance.
Use a fire extinguisher designed for electrical fires to suppress the flames.
Attempt to unplug the dryer from the power source to cut off the electrical supply.
Prioritize safety by evacuating the area promptly.
Dial 911 for professional assistance while ensuring everyone’s well-being.
If the fire escalates faster than you can control, evacuate immediately and call 911 without delay. Remember, a swift and composed response is crucial in effectively managing a dryer lint fire and preventing further escalation.
Damage Assessment and Restorative Measures
Experiencing a dryer fire can result in significant home damage. In such situations, seeking professional assessment and restoration services is essential to minimize the impact of the fire. A professional assessor would thoroughly examine the extent of damage caused by the dryer fire. Then, they identify areas requiring immediate attention for restoration services.
Valley Restoration has certified fire and smoke restoration experts ready to assist you. Whether it’s a soot removal, clean-up, or total reconstruction, their experienced team ensures a seamless home restoration process. Don’t navigate the aftermath of a dryer fire alone. Call a skilled fire restoration service today!