There are so many reasons that can cause water damage: floods, heavy rains, a burst pipe while you are on vacation, drainage problems, or snow melting and seeping through your basement. Whatever the cause, it is devastating to see water flooding your home.
The best thing to do when water damage happens in your home is to call a mitigation and restoration company like Valley Restoration and Construction right away. Our first task will be to extract the water, evaluate the damage, and move on to mitigation and restoration.
It only takes 24 hours for fungus and mold to develop where water is stagnating. Not to mention that hidden water is the perfect setting for mold to settle in. That is why water extraction is crucial for the soundness of your home’s structure and for mitigating further damage.
If you wonder what water extraction entails and how it differs from water mitigation, this guide will help you better understand the work we do here at Valley Restoration and Construction.
What Is Water Extraction?
Water extraction involves the removal of water from your home. It needs specialized equipment like pumps, dry systems, and vacuums that pump water out of floors, ceilings, and walls. Once the water has been extracted, we can move on to emergency water mitigation to make sure the building is safe.
An emergency such as a flood can fill your home with immense quantities of water. A normal mop and bucket simply can’t tackle such problems. That’s why you need professional equipment and an experienced crew.
What Do You Do In Water Extraction?
Here is the process we follow here at Valley Restoration & Construction during water extraction:
1.Stop the Water
The first step is to determine the source of the damage and stop any more water from coming into the house. For example, you must first turn off the water at the mains in case of a burst pipe. Only then can you move on to fixing it.
2.Check Electricity Circuit and Sockets
Water and electricity don’t mix well. Our professional crews will check sockets and wires to make sure they were not damaged from water, otherwise you are at high risk of a shock.
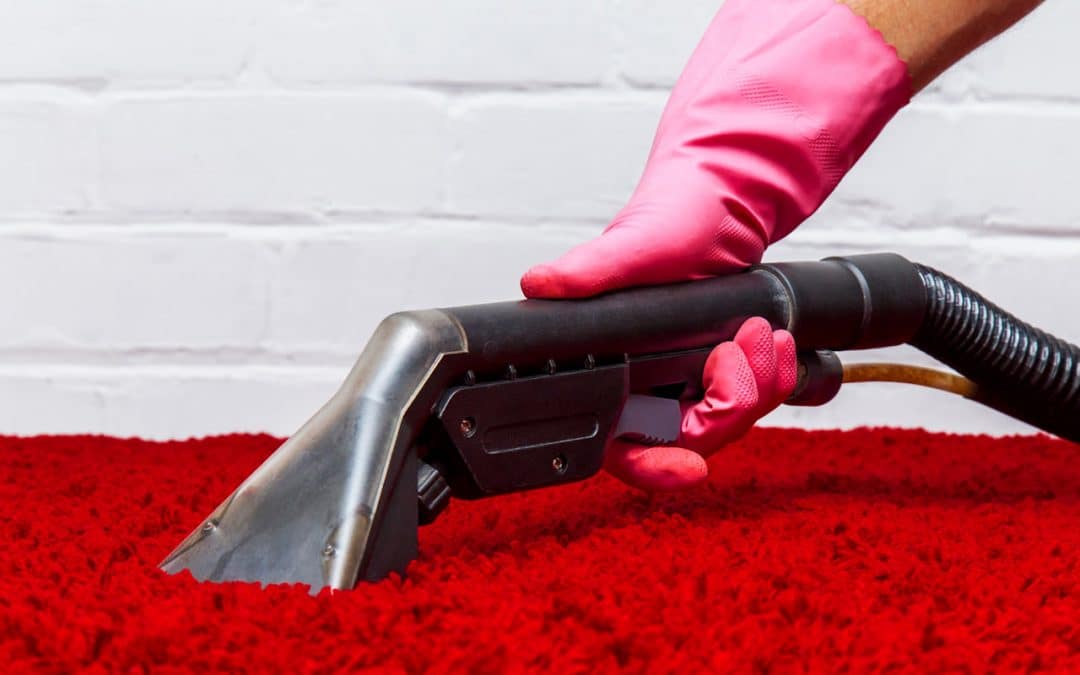
3.Extract the Water
Once electricity has been tackled, we start pumping water out of the home or building. We use specialized equipment, such as pumps that take water outside and professional vacuums that extract water and store it in a tank. We also use dry systems and other tools to pump out the water.
4.Water Extraction from Hidden Spots
The problem with water is that it’s not only found in visible spots but in hidden ones as well. Water can hide in the ceiling, under the floor, or behind drywall and walls in general. The last thing you want is for your ceiling to cave in from water damage.
We use infrared cameras to look through walls as well as moisture detectors to find whether water is lingering in invisible spots. We also use fans to evaporate water from the smallest spots in your home.
5.Drying Moisture
If a bucket of water falls on the floor, you pick up a mop and remove it. You must have noticed, however, that some moisture remains on the floor until it slowly evaporates. The same happens when large quantities of water flood your interior.
While we extract the largest proportion of water, there will be residual moisture lingering around. This moisture is sufficient for mold to develop, which is why we need to dry it out as fast as possible. We use special fans and dehumidifiers to drive away the last remnants of humidity from your home.
6.Deodorizing
The musky smell of moisture is perfect for the woods in fall but rather unpleasant in your home. A proper water extraction schedule includes deodorizing the area with foggers and approved chemicals. The aim is to eliminate any residual smells and odors from the water damage.
What Is Water Mitigation?
Once the water has been extracted, it is time for water mitigation.
What’s the difference between water mitigation and water extraction? Water mitigation comes after water extraction and aims at limiting the damage from the water. Unsalvageable items are thrown away, while those that can be professionally cleaned and repaired are removed from the property to be properly restored.
If drywall has sustained water damage, our water mitigation crew will remove the parts that have been wrecked because they are dangerous for the stability and safety of the house.
Likewise, hardwood floors are very sensitive to water damage. No matter how fast and thorough water extraction was, your wooden floorboards may have sustained damage. They can bend, crack, buckle, or cup, thus creating an uneven floor. Stains may also appear on parts of the wood that absorbed water. Water mitigation will remove any floorboards that are beyond repair.
Wooden window frames and doors can be damaged by water as well. The purpose of water mitigation is to remove those beyond repair and board up the windows to protect the home from intruders and further damage.
Water mitigation includes all the professional steps to limit the damage and stabilize the situation before a restoration crew can come in and start installing windows, doors, and floors. Water mitigation will help retain your home’s structural integrity and protect its foundations.
Once your house has dried completely, our VRC restoration professionals will start rebuilding it to welcome you home again.
Valley Restoration and Construction is your Montrose, CO, restoration company. Call us first at 970-964-4437 or contact Valley Restoration and Construction online and we will start our water extraction immediately. We work with your insurance to help you manage your budget!
Are you ready to buy the house of your dreams? Before signing the contract, make sure the house doesn’t show signs of water damage.
Water can damage the structure of your home. Leaks and broken pipes may require expensive repairs, and water damage can cause the development of mold, which is dangerous for your health.
Before embarking on your life as a homeowner, it is good to take a detailed look into your prospective home for signs of past—or present—water damage. If you don’t know where to look and how to check, here is a brief guide to help you spot any signs of water damage.
Check the Land and Where the Home Stands
If you are buying a single-family home, check the land surrounding the house. Is the home situated at the highest point of the land or is it placed at the bottom, where all the water will gather?
Your prospective home should be located at the highest point to let water flow downhill without damaging the basement or the foundation of the house. This way, it will experience less humidity and have fewer opportunities for water damage and stagnant waters.
Check for Water Puddles and Look at the Gutters and Downspouts
While you are looking at the house from the outside, notice the state of the gutters and the downspouts. Are the gutters clean and well-maintained? Are they securely attached to the roof and walls?
Likewise, check the downspouts and where they direct the water. How are the drains? Do they lead the rainwater away from the house?
You want to ensure that the pipes, drains, and gutters divert all water away from the house to minimize damage and humidity.
Water puddles around the house are signs that water stagnates there. If water sits there, it can slowly enter your basement and damage the house’s foundations.
Are All Roof Shingles Intact?
Missing, cracked, or damaged roof shingles mean that water may seep into the attic and cause damage. Make sure the roof is well-insulated and that all shingles are intact. Otherwise, you will have to budget for roof repairs.
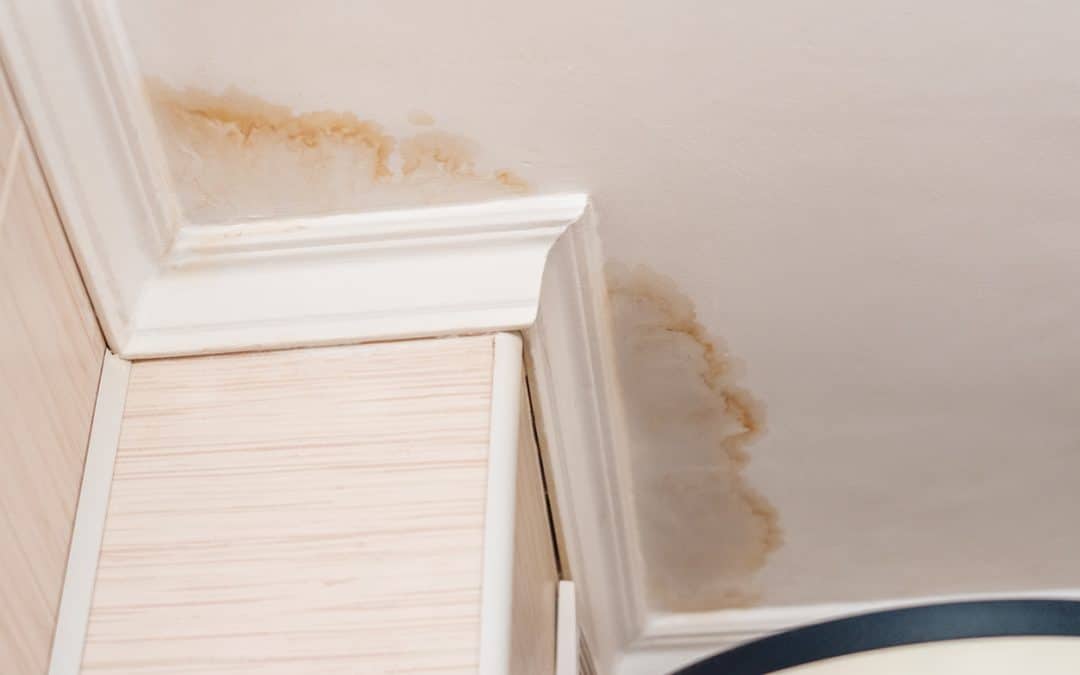
Do the Ceilings Have Water Stains or Rings?
Once inside the house, look up and check the ceilings. Do they have water stains? Water rings and stains are signs that moisture is trapped in the ceiling. They are usually more obvious at the corners of ceilings, so check carefully the ceiling’s full length.
Walls that have been water-damaged can also display water stains, so be sure to check those as well. If you spot any, ask the current owner whether it’s an ongoing water leakage or a past one. If it’s a past one, make sure it has been addressed properly.
Inspect All the Plumbing around the House
Water is distributed in your home through the plumbing system pipes. You may notice water damage and leakages along their path.
Check the pipes all around the house: in the cabinet under the sink, around the bathtub, and behind faucets. Look for watermarks, discolorations, mold, and any sign that water has damaged these areas. For instance, a wooden cabinet that has been water-damaged will show warping signs on the wood.
How Does the Floor Look?
A flood can seriously damage a wooden floor. Are there any soft spots on the floor? Is the floor warped or cracking? Do you see any discolorations? Are the floorboards uneven? If the floor is tiled, are there any loose tiles or tiles that seem to be elevated compared to the rest?
All of the above can be signs of water damage and should be further inspected.
Remember to lift any rugs and check the state of the floor underneath as well. Sometimes, rugs are placed strategically by house owners to hide previous water damage.
Smell Your Way Around the House
Some homeowners may fit a room with a carpet to hide water damage. While it may be easy to fool the eye, it will be much harder to hide the scent of mold. Your nose won’t lie to you. Smell your way around the house. Mold has a musky scent that we can all easily discern. Walk around the house, focusing on the bathroom and kitchen where most of the plumbing is found.
If you can smell mold, it means that humidity or water is trapped somewhere in the walls, floors, or ceilings.
Attics and Basements
Water usually enters a house from the roof or the ground. Attics and basements are the most exposed areas of a home and the places where moisture, leaks, and water damage will be most evident.
Take a look around the attic and the basement and notice any water damage. In the attic, water damage will be more obvious around the ceilings. In the basement, it will be more evident near the floor.
Note Any Icicles Hanging from the Roof
If the area where you are planning to buy a home has frequent and heavy snowfall, check for any icicles hanging from the roof. Although they are very beautiful to look at, they are also a sign of ice dams and suggest that the house, especially the attic, is poorly insulated.
Flaking Paint and Damp Walls
Paint sometimes peels away, giving you the perfect excuse to change the color of the room. If, however, you see paint flaking away in significant quantities, you could be facing water damage and humidity inside the wall.
Run your hand along the wall’s surface. Does it feel damp or loose to the touch? If so, humidity may be trapped somewhere behind the paint or wallpaper.
Check Metals and Water Heater
Metals rust in the presence of water and constant humidity. Check any metallic items, such as radiators or door handles, to see if they are rusty. Also check the water heater for signs of rust. If there has been a water leak from the hot water heater sometime in the past, the water will have corroded the metal, causing it to rust.
If You Find Water Damage, Call Valley Restoration and Construction
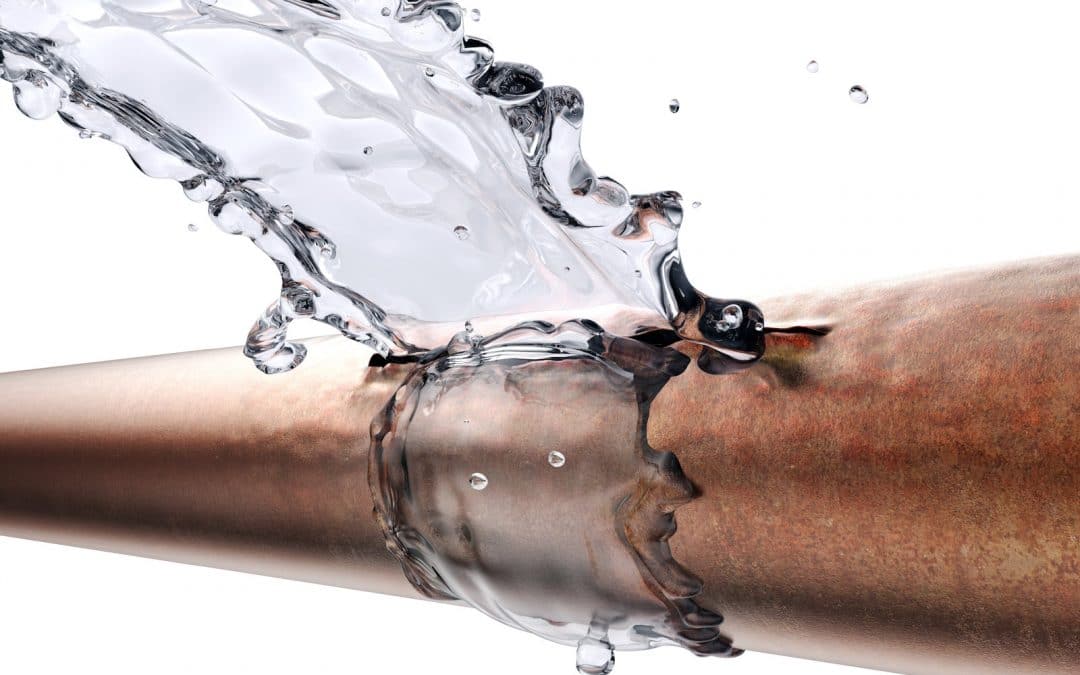
Winter is lovely as long as you have water, heat, and power in your home. Winter becomes a problem when a frozen pipe obstructs the flow of water through your home. Not only do you lack water in your house but a frozen pipe can burst, causing property damage and flooding.
It is best to prevent your exposed pipes from freezing during a cold snap or prolonged cold weather. If your pipes do freeze, you must thaw them to allow the water to flow again. If you can’t locate where the ice blockage has occurred, you should contact a licensed plumber.
Preventing frozen pipes takes a little bit of preparation in the fall and winter but doing so as part of winter-proofing your home is well worth it to ensure the comfort and safety of your home.
What’s a Frozen Pipe?
A frozen pipe means that water has frozen inside it. As frozen water expands, it blocks the passage of running water at a particular section of the pipe resulting in no running water.
How Does a Pipe Freeze?
Water freezes when it’s cold outside. Homeowners should be careful when outside temperatures drop below 20 degrees Fahrenheit as this is when pipes start freezing. Freezing depends on the location of the pipe, its exposure—northern exposure means colder temperatures—the prevailing wind, and the elements in general.
Even cold wind can freeze a pipe when it is uninsulated and exposed, so don’t dismiss it.
Where Do We Find Frozen Pipes?
Most accidents due to frozen pipes happen in basements, garages, attics, crawl spaces, around the swimming pool, or in exposed areas of your home where pipes run. That includes even kitchen cabinets: if your kitchen or bathroom cabinets get too cold, the pipes there can eventually freeze.
What’s the Problem with a Frozen Pipe?
The first obvious problem is that water freezes, there is an ice blockage, and your home doesn’t have running water.
A more important problem is that a frozen pipe can burst a pipe due to the pressure from the ice. When water freezes, it expands and applies pressure to the pipe. Water pipes are not usually made from flexible materials and can break when ice forms. A broken pipe will cause flooding. You then need to repair the pipe and fix the water damage on floors, cabinets, and walls.
How Do I Know a Pipe Is Frozen?
The easiest test is when you turn on the tap and no water comes out. This signifies an ice blockage in your pipe that stops the water from flowing freely.
Sometimes you might also get unpleasant smells coming from the drain or faucet. The ice blockage doesn’t allow smells to go down the drain and their only way is back up toward the house again.
How Can I Prevent a Frozen Pipe?
Prevention is always better than repair. It can cost you significantly more if a frozen pipe bursts in your home. You will have to call a restoration company to repair the damage and fix your pipes. It is always best when homeowners avoid damage to their homes!
Insulate Your Exposed Pipes
The most efficient way to prevent frozen pipes is to insulate them, especially those that are exposed in your garage, attic, basement, crawl space, and outside. If you have pipes that get very cold behind your kitchen cabinets, insulate those as well. Insulation will keep the inside of the pipe at above-freezing temperatures and water will flow.
Let Your Faucet Drip
If you have an exposed pipe, you can let the faucet that is linked to this pipe drip a little when the weather is very cold. Running water is more difficult to freeze than standing water.
Close Your Garage Door
Your garage is cold. Don’t make it colder yet by leaving the door open. Even small temperature increases can make the difference between a frozen pipe and one that flows freely.
Keep Your Home Warm
You obviously like it to be nice and cozy at home in winter. However, some homeowners choose to lower the indoor temperature at night or when they leave their homes for work or for an extended period of time. You should keep your home temperature constant to prevent your pipes from freezing.
Seal Your Home Walls
If you have cracks in your walls or around windows and doors, seal them in the fall to prevent cold air from coming inside. This is particularly helpful in areas that are cold anyway like your basement or garage. There is no need to add frigid air to an already cold room.
Insulate Your Crawl Space
Insulate your crawl space by closing the vents to prevent cold air from coming in. Even temporary insulation can do the trick.
What Do I Do If My Water Pipes Are Frozen?
If your water pipes freeze, you will have to thaw them. Do not use anything with an open flame because you risk damaging your pipes or causing an accident. Instead, use an electric heating pad, hairdryer, portable space heater, or even a towel soaked in hot water that you renew frequently.
Once the pipe is thawed, you should have full pressure on your faucets. You will need to check carefully to see if the pipe has already burst: sometimes, the pipe bursts further down the line from the ice blockage.
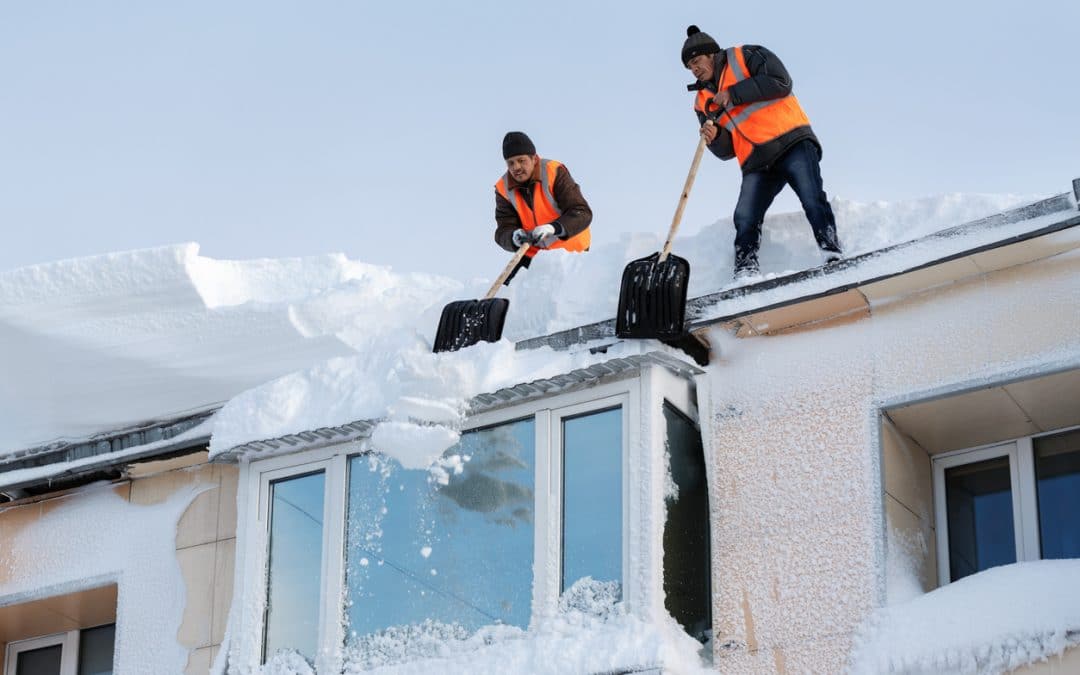
It is wintertime and snow is everywhere around you. As it piles up on your roof, it puts increased pressure and weight on the frame of your house. When the snow gets too heavy, you risk losing your house stability, leading to structural problems.
To prevent that, homeowners may need to relieve their roofs from the weight and damaging effects of snow. There are several ways you can do that. The safest way is to call an experienced crew, who will come with the proper equipment to clean up your roof from the snow.
If, however, you feel you prefer to clean your roof yourself, here are a few things to remember and some tips about how to remove snow from your roof in a safe yet effective way.
What Happens If Snow Builds up on My Roof?
A winter wonderland is certainly beautiful until you look up and realize your roof is creaking under a thick layer of snow.
Most modern structures have been designed to withstand significant weights on the roofs. Depending on where you live, the building code will determine how strong your roof should be and what types of loads it can bear. Obviously, homes in Florida have different building requirements than Michigan ones.
When the snow starts piling up dangerously on your roof, it can cause your roof to bend downwards, warping it where the load is heaviest.
Ice dams are an additional danger, potentially damaging your shingles and affecting roof integrity. Ice dams build up when there is poor insulation. The heat from inside the house shifts outward through the windows and doors and melts the snow. Because of the low outside temperatures, the melted snow turns into ice and hangs from the roof.
Ice dams can damage your gutters and singles. When more snow melts, it can’t find its way down the slope of the roof because the ice dams obstruct it. Water seeps under the roof shingles and can make its way into the house.
How Much Snow Is Too Much on My Roof?
Most modern houses can bear loads on their roofs of at least 20 pounds per square foot and up to 40 pounds per square foot. Older homes, which have been built with more lenient building codes, will probably be more sensitive to heavy loads on the roof.
A crucial factor that will help you determine if you need to remove the snow from your roof is the type of snow that has fallen.
Wet snow is heavier than dry snow. While dry snow weighs approximately 5 pounds/sq. foot, wet snow can weigh as much as 20 pounds/sq. foot. Ice is even heavier than wet snow and can weigh up to 57 pounds/sq. foot.
Generally speaking, and assuming that your home has been built to current building codes, your roof should be safe with up to four feet of dry snow or two feet of wet snow. Anything over that and the structural safety of your home could be compromised.
How Do I Know If There Is Too Much Snow on My Roof?
A practical and quick test to check if the snow weight on your roof is becoming dangerous is to test your internal doors. If your door opens freely without sticking to the floor, it means your roof is OK. Likewise, your windows should open unobstructed.
If, however, they are stuck, you hear creaking sounds, or you notice cracks around your windows and doors, then you should be concerned.
How Can I Remove Snow from My Roof?
Removing snow from your roof can be tricky. Much depends on the roof’s slope. Thanks to gravity, roofs with inclinations will get rid of the snow faster than flat ones.
If you feel that too much snow has built up on your roof and you feel concerned about your home safety, you can lighten up the weight by removing snow with a snow rake.
Snow rakes are like normal rakes, except for a telescopic handle that adjusts its length. The rake itself is equipped with a rubber squeegee that acts as a soft blade on the snow.
Standing on the ground, you can start raking your roof, starting from the edges and moving inwards, as far as the length of the rake’s handle allows you.
Here are a few tips to help you when you remove snow from your roof with a snow rake.
Don’t Stand under the Rake
Make sure you don’t stand right under the rake. As you take off the snow from the roof, it will land on your head. Besides freezing, snow is heavy and could hurt you.
Where Will Snow Fall?
Calculate where the snow will fall and make sure there are no cars, people, or pets where you expect the snow to fall off the roof.
Don’t Direct Snow onto Your Gutters
Be careful not to clog your gutters with snow, as it can freeze there and obstruct water from flowing freely. This could cause a flood.
Work a Little Snow at a Time
Work a little snow at a time. Snow is heavy, so rake off small patches of snow instead of big ones. Large chunks of snow will pack and create snow so heavy that it may be impossible to rake from the ground.
Don’t Use Metal Tools
Don’t use metal tools on your roof. Metal tools can scratch and damage your shingles and other roofing material.
Don’t Rake with Heavy Winds
Avoid raking the snow with heavy winds. It could displace the snow on the roof and put your safety in danger.
Be Careful with Auxiliary Buildings
Remember that auxiliary buildings like sheds have weaker structural frames. A little weight can endanger their stability. Make sure you rake them first, if possible, and don’t attempt to climb on these buildings: your weight could overload the roof and make it collapse. For the same reason, don’t load up snow on parts of your roof located over weaker structures, such as conservatories and garages.
Don’t Climb on Ladders
Slippery conditions and ladders don’t go well together. Don’t try to carry your snow rake up on a ladder to reach your roof. You could slip on icy rungs or fall off the ladder while maneuvering the rake. If you can’t reach deep enough with a rake, it is time to call a professional crew.
You Don’t Have To Rake All the Snow off Your Roof
Your roof has been constructed to bear substantial weight. You don’t have to rake all the snow off the roof, just the excess so that you lighten up the overall weight.
Also, you don’t want to rake directly on your roof’s shingles, or you could damage them. A couple of inches of snow on your roof won’t cause any damage.
Watch the Weather Forecast
Before you decide on clearing snow off your roof, take a look at the weather forecast. If more snow is predicted and you are already concerned about the existing snow on your roof, then it’s best if you take the existing load off your roof. If you don’t, more will build up and you will find it even more difficult to rake it, not to mention that it could eventually endanger your home’s stability.
On the other hand, if the weather forecast predicts warmer weather, perhaps you can wait for nature to melt the snow as long as you don’t have any signs of impending danger.
What If Clearing My Roof of Snow Is Too Much for Me?
Clearing your roof can be exhausting and even dangerous. If you feel that a simple raking technique won’t do it, contact a professional snow cleaning crew who will come with the proper equipment and know-how.
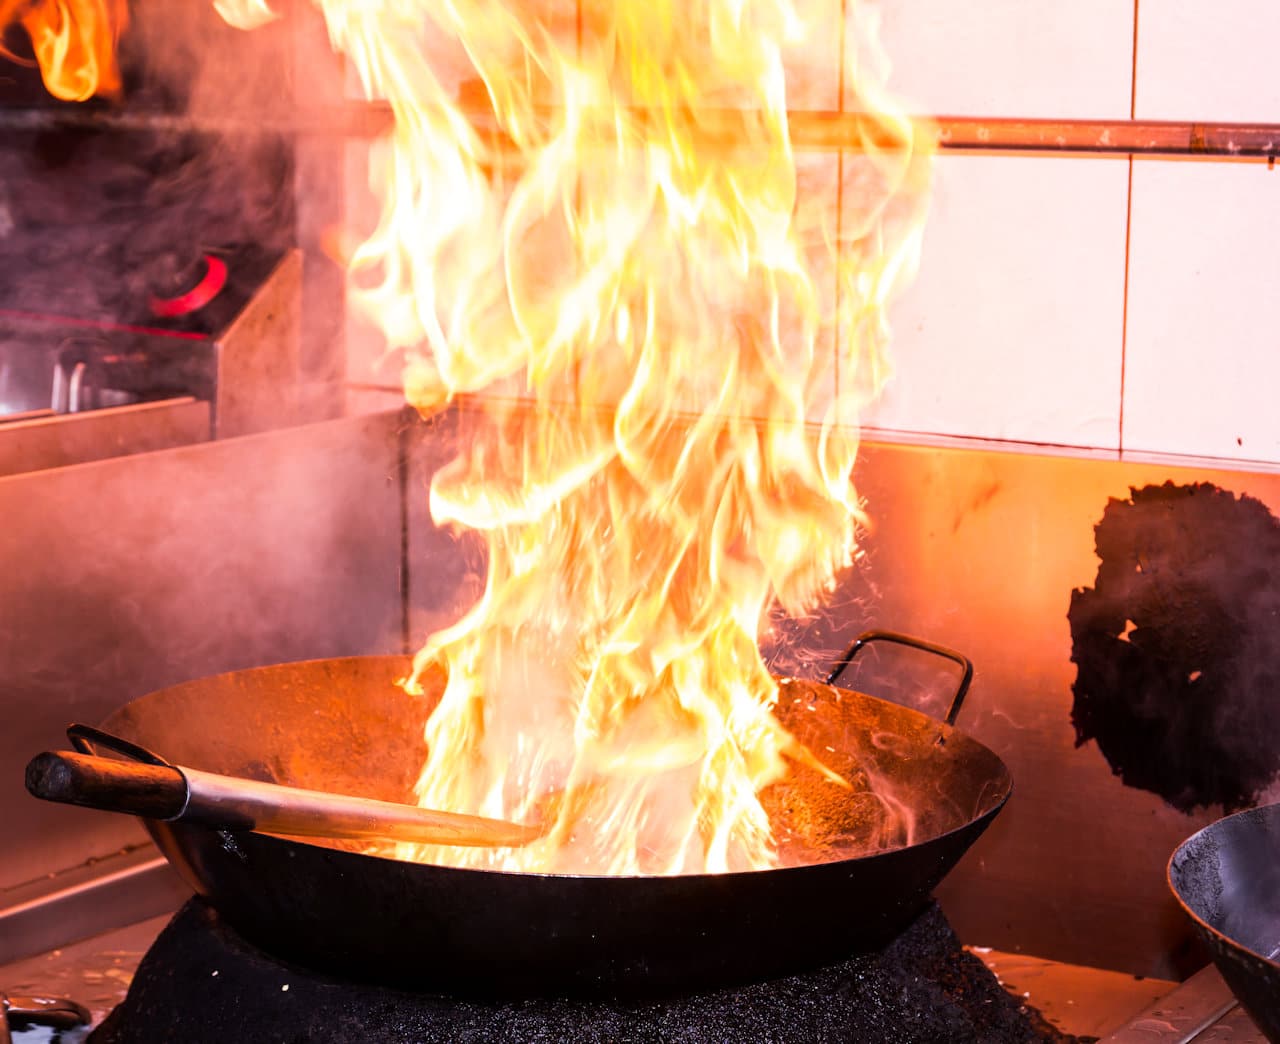
More than 40% of house fires start in the kitchen. Ovens, stovetops, microwaves, and other electrical appliances are responsible for most kitchen-related fires.
The presence of hot oil and other oily substances make fires in the kitchen more hazardous and dangerous, especially since many don’t realize that the worst possible thing you can do is throw water onto a flaming pan.
As mitigation, restoration, and reconstruction specialists, we have witnessed numerous fires that started in the kitchen and spread into the rest of the house. We strongly advise homeowners to make sure their kitchens are safe and clean and to have fire extinguishers, fire blankets, and fire alarm systems installed to mitigate any fire that starts there.
Follow the tips below to ensure your home’s safety!
Small Steps to Ensure Your Kitchen Is Fire-Proof
Keep Your Kitchen Clean
A clean kitchen is a safe kitchen.
Grease and oily substances can be kindling for fire so keep your stovetop and oven clean. Food remnants in the oven can become hazardous with high temperatures. Greasy stains on your stovetop can heat up and cause a fire to spread quickly.
Keep Children Away from the Kitchen
No matter how much you want to introduce your 3-year-old to the wonders of cooking, you should be extra careful when having children in the kitchen. For maximum safety, install strap locks onto the oven door and stove knob stops to make sure that toddlers can’t fiddle with them.
Supervise Your Cooking
We all do it and it’s wrong: putting a pan or pot to boil, fry, or bake and then walking away for “just a second” to make a phone call, clean up, iron some clothes, watch some TV, or read a book.
Unfortunately, it is easy to lose track of time. You should constantly supervise your pots and pans, especially in the case of frying. Always be alert to the possibility that high temperatures and oil can easily lead to fire!
Don’t Use Your Oven for Storage
It’s the time of the year for the elf to get off the shelf and… find itself inside an oven. A quick Internet search will show you how easy it is for the poor elf to turn into a lump of coal. Even when it’s not the elf who’s on fire, it can be a pot or leftover food. When you lack storage space, it is tempting to put your pans, pots, or even food into the oven. However, while convenient, if you try to preheat your oven with these still inside, you risk a fire. Plastic from pot handles, for example, can melt and burn.
Don’t Leave an Empty Pan on a Hot Burner
After you’ve cooked and drained your pasta, don’t put the empty pot back on the hot burner. At best, you risk destroying your pot. At worst, the bottom of the pan can get so hot that it causes a fire.
Don’t Wear Loose Sleeves
It may come as a surprise how many people get their sleeves burnt while cooking. Don’t wear loose sleeves or any clothing that has tassels or other accessories hanging. These could easily catch fire from your stovetop as they slide over it.
Likewise, don’t leave kitchen tools, tea towels, and other flammable material near a hot stove: they could easily melt or catch fire.
What Should I Do If a Fire Starts in the Kitchen?
Don’t Immediately Pour Water
Our first instinct is to pour water on fire. Yet, in the kitchen, and depending on the fire cause, this may be the worst thing to do. When you pour water on burning oil and grease you are spreading the fire even further, causing more damage and perhaps even an explosion.
Instead, and if your fire is manageable—for instance, a pan or pot that’s caught fire—you should smother the fire to deprive it of oxygen. That could be something as simple as putting on a lid, a fire blanket, or baking soda.
If you can, turn off the oven or the stovetop. This will leave the fire without any further fuel, making it easier to put it out. If the fire started in the oven, keep the oven door closed to stop the fire from spreading.
Call the Fire Department
If the fire is too extensive, close your kitchen door and get out of the house. Remember to close all the doors from the kitchen onwards to stop or slow down the spread of fire throughout the house. Make sure all members of the households are accounted for and out of harm’s way. Call the fire department right away.
If You Smell Gas in Your Kitchen
Never turn on your stovetop or oven if you smell gas in your kitchen. Open the windows as wide as possible and call a professional to identify the problem. Avoid breathing in the gas, close the door, and stay out of the room. Turn off the main shutoff valve, which is usually located just before the gas meter.
Fire Equipment for Your Kitchen
To keep your house safe and make it as fireproof as possible, you should invest in fire equipment.
A well-maintained fire alarm system is the first step toward ensuring your kitchen is safe. Even if there are some false alarms, it’s better to be safe than sorry.
A fire blanket located close to the stovetop can quickly stop a small fire from spreading. A fire blanket is made of strong fireproof material. When you throw the blanket onto a fire, you deprive the flames of oxygen, letting you put out the fire with ease.
A fire extinguisher can also help you put out a fire and spare your home from further damage. However, remember that not all fire extinguishers are suitable for all kinds of fire. An ABC dry powder fire extinguisher can be used on most kinds of fires, including class A, B, C, and electrical fires:
A class A fire will burn flammable solids as fuel, e.g. wood and paper.
Class B fires burn flammable liquids, e.g. petrol and paint.
Class C fires burn flammable gases, e.g. propane and butane.
Electrical fires involve electrical equipment.
Class F fires will burn cooking oils and fat, e.g. from a deep fat fryer like a chip pan. Because of the extremely high temperatures involved, class F fires require a wet chemical fire extinguisher.
Valley Restoration and Construction Is Available 24/7
If, despite all your best efforts your kitchen catches fire, Valley Restoration and Construction is available 24/7 at 970-964-4437 to mitigate any fire damage and restore your kitchen and home.
Call us now at 970-964-4437 or contact Valley Restoration and Construction. We are available 24/7 online and can take care of basic fire clean-up, soot removal, or total reconstruction and repair of a fire-damaged kitchen.
You only need to watch TV for a few minutes before you come across a crime scene with HAZMAT professionals cleaning up the area from biological substances and other hazardous material. However, crime scenes are hardly the only situation where a HAZMAT cleanup is necessary. And if you think that this type of event only happens in movies and crime series, think again: HAZMAT cleanup incidents happen on a daily basis!
We are surrounded by chemicals and hazardous substances that can leak or spill. And we are often unaware of the number of biological hazards that can damage our health. For instance, for the last two years, HAZMAT cleanup services have been frequently required to disinfect Covid-19-infected buildings, nursing homes, and offices.
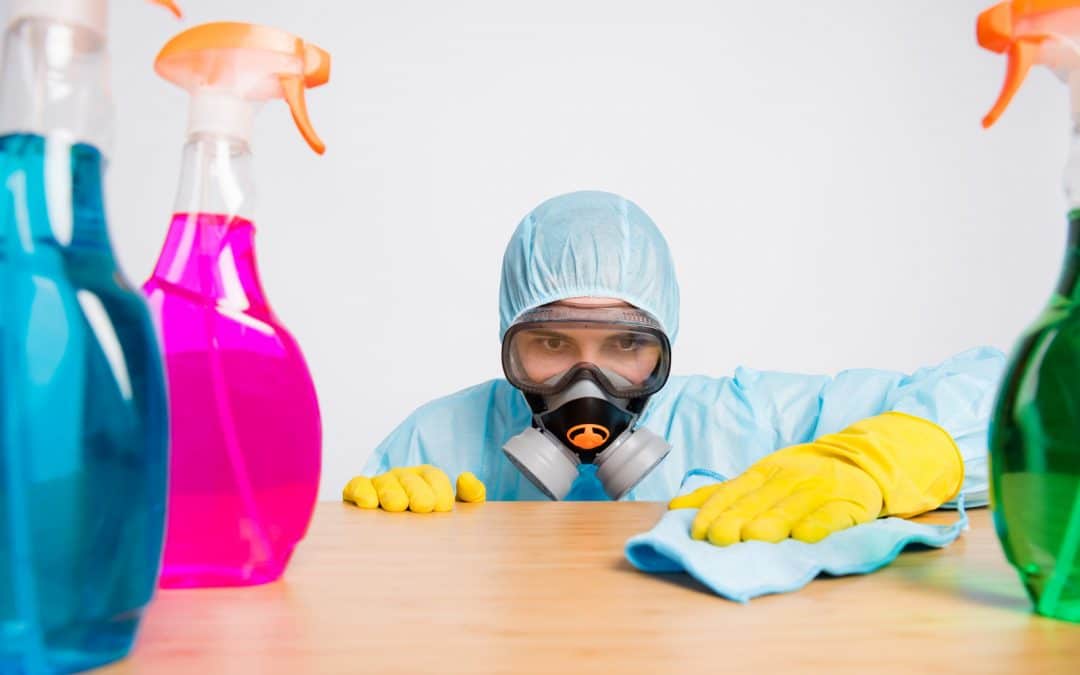
Dangerous substances and biological materials can harm you and affect your health. Unfortunately, they can’t be cleaned by simple household cleaning appliances and disinfecting products. Also, most people lack the proper gear or know-how to contain the damage and safely dispose of the unwanted material.
Additionally, there are strict EPA regulations regarding the disposal of such materials in a way that safeguards your safety and the safety of the whole community. For instance, you cannot leave lead or asbestos residue in a common dumpster.
A professional restoration company can help you secure your home and clean it up safely and professionally.
What Are Hazardous Substances and Biohazards?
Although these two terms seem quite similar, they are not.
Hazardous substances refer to non-living organisms. Hazardous substances include lead, asbestos, mercury, gas, oil, acids, toxins, propane, or any other non-biological but dangerous substance. These materials can be flammable, corrosive, or toxic and can cause serious damage to people’s health if inhaled or touched.
A biohazard, as the name suggests, is derived from living organisms. Biohazards include blood and other bodily fluids, vomit, animal waste, sewage backup, as well as bacteria and viruses.
What Types of Incidents Do HAZMAT Specialists Respond To?
Here at Valley Restoration and Construction, we have responded to asbestos incidents in homes and offices. We are certified as Colorado State General Abatement Contractors for asbestos removal and have been called repeatedly to remove asbestos from houses, offices, and other buildings.
We are also often called for mold infestations. Mold removals can be particularly tricky, as it can be hard to know if your home has dangerous molds. In many cases, only professionals with the right tools, equipment, personal protective equipment (PPE), and cleaning products can sort out a mold problem.
There are plenty of other incidents where a HAZMAT specialist is required, from rodent infestations—complete with droppings—to gas or oil line spills, sewage backup from a clogged pipe, or even hoarding cleanups after a house has been left vacant for years.
What Does a HAZMAT Cleanup Team Do?
HAZMAT is short for Hazardous Materials. Accordingly, a HAZMAT team is responsible for cleaning up an area that contains hazardous materials, biohazards, or both in a way that is safe for the crew, the environment, and the people who normally occupy the area.
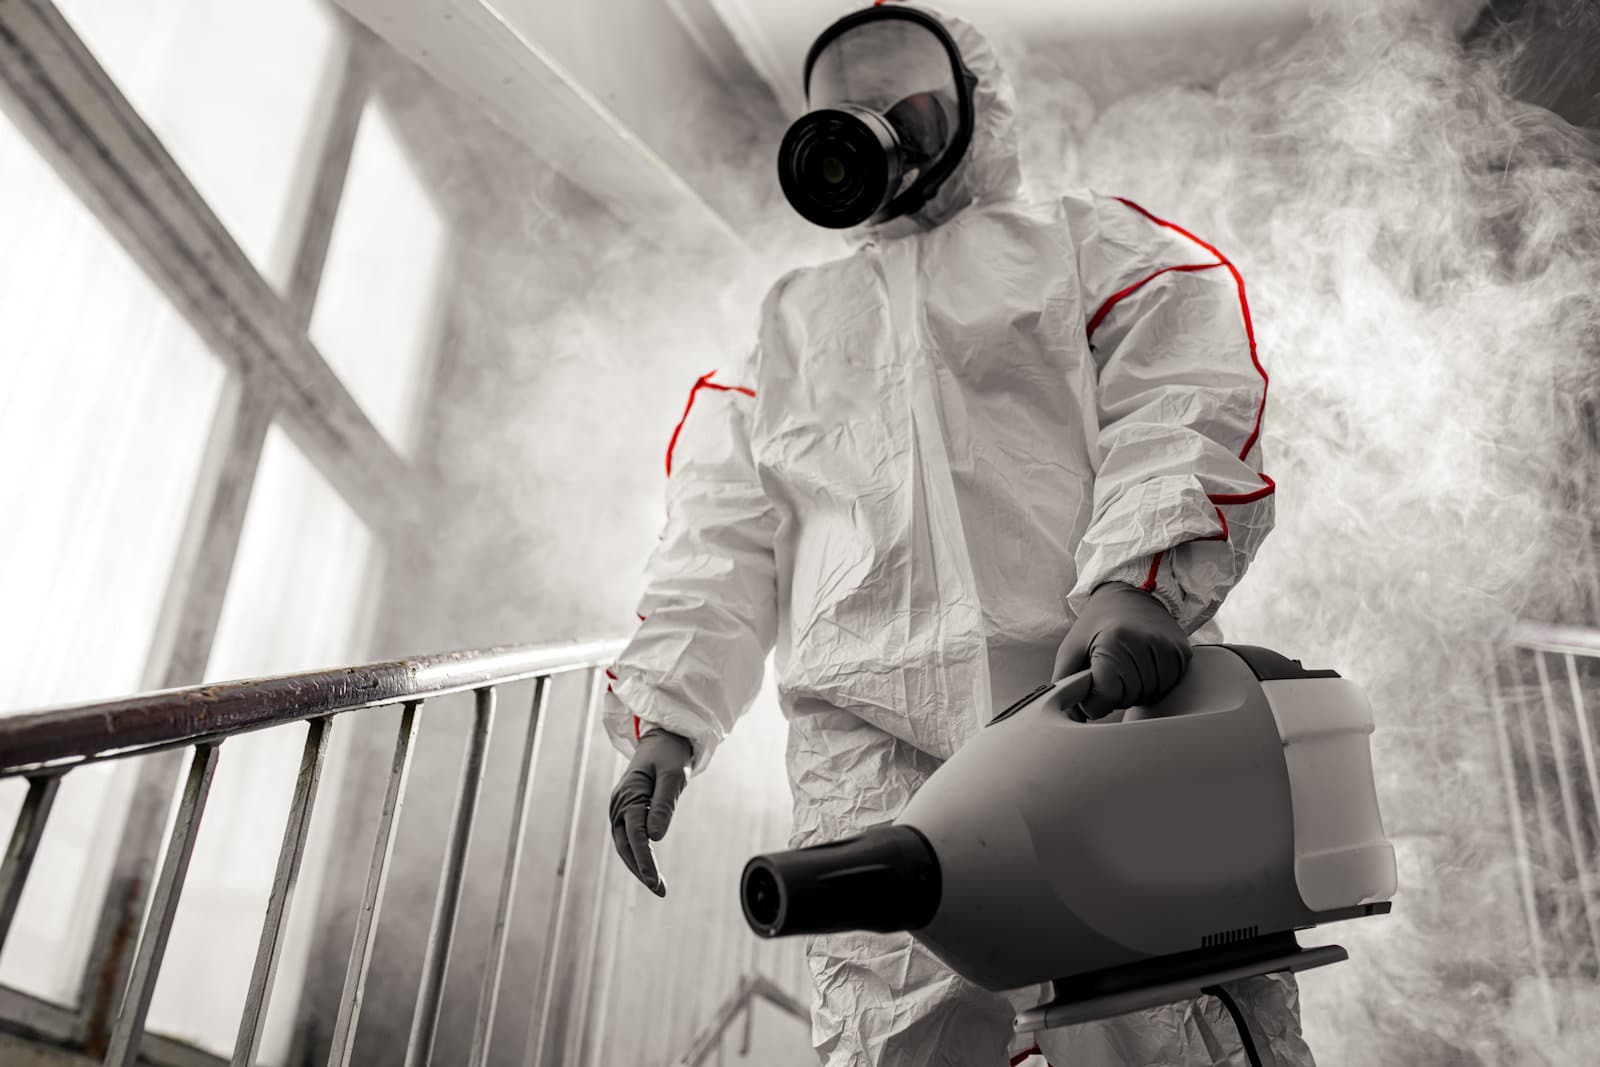
What Does a HAZMAT Cleanup Team Wear?
The team is wearing HAZMAT gear. This includes gloves, personal protective equipment (PPE), chemical spill boots, and even respirators if there are toxins and other materials or biohazards that present a health risk or endanger the cleanup crew’s safety.
Does a HAZMAT Team Work with Household Cleaning Products?
A HAZMAT team doesn’t use your average cleaning products and paper towels. They have professional cleanup equipment such as special waste containers for hazardous materials with strong bags that seal tightly.
All the cleaning equipment is geared toward heavy use. Also, after the cleanup, a lot of the equipment will be disposed of, including buckets, brushes, brooms, mops, and sponges: none of these can be used in another incident.
The cleaning materials used are industrial strength: aside from bleach, there will be professional deodorizers, cleaners, and disinfectants that work for chemical spills and toxins.
The experts need to ensure that all surfaces have been thoroughly cleaned. That includes ceilings, cracks under the floor, and even the tiniest space under the stairs. They require far-reaching brooms, brushes, and ladders as well as different-sized ones to fit in all spaces.
First, the HAZMAT Team Evaluates the Scene
Just with any other emergency, a cleanup team needs first to go to the scene and evaluate the situation.
This team of professionals will see whether the spill or the chemical or biological hazard is flammable or corrosive. They will also estimate whether it’s toxic to inhale. If there is a danger of fire, they will turn off any electrical appliances (fridge, washer, boiler, or heater) that could start a fire. In the event of sewage backup, they may turn off the water.
The HAZMAT Teams Contains the Damage
The next step is for the HAZMAT experts to contain the damage. It’s far easier to clean up a small area like a room than an entire house.
A professional will make sure all areas are checked for contamination. That means they will check the HVAC system for airborne bacteria. They will also check the fan’s blades, the areas behind appliances, and the space under the carpets to make sure no fluids, bacteria, mold, lead, or asbestos has found its way into the house’s smallest nooks and crannies.
Only after the damage has been fully contained and controlled will the team start to clean the space with professional cleaning products and industrial equipment.
The HAZMAT Team Will Dispose of the Dangerous Material
It is illegal to dispose of hazardous materials and biohazards in a common dumpster. There are strict EPA regulations that must be followed. You removed lead or asbestos from your home because it’s dangerous to your health. It is equally dangerous to other people’s health and should be disposed of according to health safety guidelines.
Your remediation and cleanup contractor will take care of all your cleaning and decontamination needs. The HAZMAT team will package the waste, tightly sealing the content in the right bags and clearly labeling them with their content. You will be seeing the combination of appropriate equipment, experience, and intimate knowledge of EPA guidelines.
The cleanup crew will also handle the proper disposal equipment and dispose of hazardous substances depending on their source. Some materials will go to waste incinerators while others will go to EPA-designated areas to be terminally eliminated.
Valley Restoration and Construction for Asbestos, Radon, and Mold Removal
It doesn’t matter if it is your home or office building that requires professional cleaning: Valley Restoration and Construction will ensure a clean and safe space for your family or colleagues.
If you need HAZMAT cleanup, call us now at 970-964-4437 or contact Valley Restoration and Construction. We are available 24/7 online and will restore your home to its previous condition with minimal inconvenience to you.